Solea Online Help

This document contains complete help for Solea System.

1) INTRODUCTION

1.1) Preface

In short term, Solea is a music automation system software. It has been released at the end of year 2002. All the rights are belong to DMKsoft. First, it was developed for radio stations. Later some modules was added so that it became a need for all locations making music broadcasting (e.g. hotels, shops, restaurants).
Solea word is the name of a form in Flamenco (Spanish folk music and culture). This name was preffered because of having same pronounciation in all languages.
Features of Solea can be summarized as below.

1.2) Technical Features


Features that will distinguish Solea from similar softwares with a thicker line can be collected in 4 main groups.

Server Application and Database

Client Application

1.3) System Requirements

Minimum Configuration (hardware and operating system)

Server Side:
600 MHz CPU (processor)
1 GB RAM (memory)
Windows XP operating system
Sufficient disk space for audio files

Broadcasting Side:
800x600 screen resolution
Any brand/model sound card (No need for sound card in streaming method)
The Server and Broadcast side can be the same PC. Other clients (production computer, commercial booking computer etc.) may be the same feature as the broadcasting side.
Recommended Configuration (hardware and operating system)

Server Side:
1+ Ghz multi-core CPU (processor)
4+ GB RAM (memory)
64 bit Windows 11 or Windows 2016 Server operating system
One 60+ GB SSD disk, One 500+ GB normal disk.
(The SSD disk will be used for fast access to the database. 2+ GB of it will be partitioned as D: disk, remaining part (58- GB) of it will be partitioned as C: disk, . The operating system will be installed in the C: partition, and Solea's database file will be configured in the D: partition. The other disk will be partitioned as E: and will be used for storing audio files.)

Broadcasting Side:
Dual Monitor supported, 1280x768+ resolution graphic card and monitor(s)
2 sound cards or 1 multi-output sound card
(One for broadcasting, the other for pre-listening. The one for broadacating must be noiseless and balanced.)
The Server and Broadcast side can be the same PC. Other clients (production computer, commercial booking computer etc.) may be the same feature as the broadcasting side.

1.4) Installation

1.4.1) Setting up Solea for the first time:

NOTE 1: When you apply the installation as mentioned above, SoleaData folder will not be safe enough.
You will have a risk of losing existing data when you format the C: disk, uninstall the Solea System or make a new installation on existing SoleaData folder.
So, it is recommended that you should apply the operations below.

  • Copy the SoleaData folder (Program Files\Solea4\SoleaData) to another disk or another location in same disk (e.g. D:\SoleaData).

  • Rename the SoleaData\SoleaDb4\SoleaDatabase_xxxx.db file under new location (e.g. SoleaDatabase_MixFM.db).

  • Check the security options of SoleaData folder on new location (be sure that a user named everyone has full access privilege for this folder).

  • Run Solea, click the System / Show Solea Server from the main menu.

  • Click the Settings / Database Settings... option from the Solea Server's main window.

  • On opened window, select the db file on new location to SoleaDb row, select SoleaMusic folder on new location to SoleaMusic1 row.

  • Terminate the Solea, save changes, terminate the Solea Server.

NOTE 2: Your Antivirus software or Windows Firewall may require confirmation for SoleaSrv.exe to run.
Allow Solea Server to work at this stage (never block it). Otherwise the Solea System will not work.

NOTE 3: You can use Windows Control Panel to uninstall the Solea System.

1.4.2) Making Solea Licensed:

  • Exit all Solea applications connected to Solea Server. Make sure that the Solea Server application is also closed.

  • If the software protection equipment (dongle which is Sentinel HASP brand and supplied from our company) is plugged, remove it.

  • Run the Sentinel_LDK_Run-time_setup.zip file located in the "Extras" directory of the Solea CD.
    If you do not have a Solea CD, after downloading and extracting Sentinel_LDK_Run-time_setup.zip (13.3 MB) file (its zip password is solea), you can do this.

  • Plug the dongle after installation is finished.

  • You can run Solea application when the drive detection is complete.

1.4.3) Refining Shortcut:

    After installation finished, you will see a Solea4 shortcut on Windows Desktop. This shortcut has 2 startup parameters (u and p) at the beginning.
    You can modify these parameters and/or add new parameters as mentioned in Startup Parameters.

    Example:
    u:ADM p:2000 m:R

    These parameters will obtain you will enter Solea wih user ADM and password 2000, Radio On-Air Panel will automatically be opened.

1.4.4) Upgrading Solea:

  • You do not have to remove the Solea System that you have already installed. It is advised that you install on existing one.

  • Obtain a newer version of Solea Setup application.
    "Solea Setup" will decide which components need to be updated.
    Without changing any option, complete the installation by always clicking Next button.
    You should allow existing folders to be overwritten during installation.
 

1.4.5) Providing SoleaData in order to use on another computer:

Best method for this operation is getting backup (from the running Solea Server) by using Solea Backup application.
If you want to perform this operation without using Solea Backup:
  • Learn where the SoleaData is. If you don't know, click Settings / Database Settings... option on Solea Server application's main window, then see the location of SoleaData in newly opened window.

  • If the disk where SoleaData folder exists is usable but your computer is not usable, try to find correct SoleaData folder.
    For this purpose: Search for SoleaData and/or SoleaDb4 folders in your disk (SoleaDb4 folder is under SoleaData folder). If you find more than one, consider the newest one (Check the last modified date information of the files under SoleaDb4 folder).

  • Take a copy of SoleaData folder to other computer's disk (e.g duplicating to external disk then pasting D:\ or copying from the network).
    If you want to preserve your Local Settings (e.g. "Write To File Settings", "Panel Style" etc.), take a copy of Solea.ini file (under C:\Program Files(x86)\Solea4\Client) also (copy to a portable disk).
 

1.4.6) Using a Provided SoleaData on another (new) computer:

  • Install Solea System if it is not already available on new computer.

  • Copy the obtained SoleaData folder to a suitable location on new computer (e.g. D:\SoleaData).

  • Check the security options of SoleaData folder on new location (be sure that a user named everyone has full access privilege for this folder).

  • Run Solea, click the System / Show Solea Server from the main menu.

  • Click the Settings / Database Settings... option from the Solea Server's main window.

  • On opened window, select db file on new location to SoleaDb row, select SoleaMusic folder on new location to SoleaMusic1 row.

  • Terminate the Solea, save changes, terminate the Solea Server.

If you have a Solea.ini file obtained from your old computer, you can copy it to Client folder (C:\Program Files(x86)\Solea4\Client). So that your Local Settings (e.g. "Write To File Settings", "Panel Style" etc.) will be transferred to new computer.

1.5) I'm beginner. What should I do first?


When you follow the steps below, you will have introduced to Solea successfully. Now you are familiar with playing files in Play List and/or Radio On-Air Panel. The topics you will need after that should be storing files in database and using them in Play List and/or Radio On-Air Panel. You can look at the topics below.

Song Definitions
Play List
Radio On-Air Panel

1.6) Frequently Asked Questions (FAQ)

Can I use Solea without purchasing it?
Yes. Unless you are using Solea for commercial purposes (e.g. in radio station, hotel, shopping center etc.), you can use almost all functions of Solea as DEMO. The major limitation in DEMO is related to broadcast panels. Broadcast panels can run just 4 hours. You will not need those panels for archieving your audio files, listening to musics from database. Instead of those panels you can use Play List window which has no limitation. Solea will maintain many advantages to you in most cases such as listening, archieving, querying, reporting etc., and perhaps it will make you addicted.


I want to format my computer. How can I do this without loosing current Solea data?
In this case your old computer (before formatting) and new computer (after formatting) are same.
You should transport Solea data from old computer to new computer and apply some settings.
For this purpose apply 2 steps below.


Which types of audio formats can be used in Solea?
Solea can decode (play) MP1, MP2, MP3, M4A, MP4, BWF, OGG, WMA, AAC+, AC3, APE, DTS, FLAC, WAV formats and can encode MP2, MP3, OGG, AAC+, FLAC, WAV formats with suitable plugins. Some plugins are available with setup.


Can I change the panel designs in Solea?
Yes. You can change the views of the radio panels by using Solea's Panel Designer tool. By the help of this tool, you can add and remove panel's components (Jingle Box, Broadcast List, Date, Time, Player, etc.), you can change the size and location of them.
You can also create and use new designs outside of existing designs. In order to change the colors of the components in active panel, you can click the Color Settings... button on Settings window of Solea.


How can I access and use the Solea Database from another computer over network?
You must first install the Solea client to that computer (see Installation page). When you run the Solea first time, name or IP address of the server computer will be required. If you enter the name or IP address of the computer where the Soleaa Server application is running, you can easily connect and access the Solea Database.


How can I start the Solea without entering user name and password?
If you comply with the security risks, you can carry out this request by using Startup Parameters.


Can Solea start, open and play from broadcast panel automatically as soon as Windows started?
Yes. This feature is very useful for the places where the electricity breaks occur frequently. You can do this by using Startup Parameters.


Can I change the broadcast panel and play list colors?
Yes. You can use Color Settings... button on Settings window.


In hotels, do I have to use separated multi-channel sound cards (which are very expensive) in order to make multi-channel broadcasting?
No. You can use on-board soundcard (or any cheap soundcard) having surround (5.1 or 7.1) feature. By using this type of sound cards 6 or 8 channel broadcasting can be done. You can assign that sound card and its channels for separate locations by using Multi-Broadcast Module / Location Settings... button on Settings window.


How can I change the order of commercial spots planned for future date?
Open "Daily Task". After filtering desired date, select "Date/Time" from Group menu. Then you can change the order of the spots by dragging and dropping.


Can I send current title information to Omnia Stream Encoder?
Yes. Click the Radio Module / Write-To-File Settings button on Settings window.
On the opened window, select a configuration 1 to 8 and Enabled. Click Restore Defaults button and select "Web Streaming (txt)".
Activate the Http-Get option in Target box. Type http://127.0.0.1:7380/parameter/pgm_0/enc/stream_metadata= to Url box. In some models you may have to type http://127.0.0.1:7380/parameter/station_0/streaming/metadata_fm_prefinal=.


1.7) Trouble Shooting

I cannot connect to Solea Server from a local or a remote  computer.
Look at the Connecting To Server section.


My computer where the Solea database exists has crashed. I want to format my computer. How can I save the existing Solea database?
In this case your old computer (before formatting) and new computer (after formatting) are same. You should transport Solea data from old computer to new computer and apply some settings.
If the disk where the SoleaData exists is usable or you have a backup of SoleaData folder, you can apply the steps below.


In Daily Tasks Section of Radio On-Air Panel "Automatic" light is not enabled. Daily Tasks are not broadcasted.
Your computer is not assigned as Broadcast Computer.


Multi-Broadcast On-Air Panel doesn't consider and broadcast Daily Tasks
"Daily Tasks..." button must appear as . If it appears as .
Click this button and check the "Enabled" option at the bottom of the opened window. If it is already checked it means that your computer is not assigned as Broadcast Computer.


Although I'm a licensed user, the On-Air Panel closes itself in 4 hours.
Dongle is not plugged in to your server computer or its driver is not loaded. You can look at the section Making Solea Licensed. If the problem persists although you are sure about the dongle and its driver; it may due to RDP (Windows Remote Desktop) connection. When you connect to host computer via RDP and start the Solea Server application, dongle driver is bypassed. Start Solea Server on broadcast computer directly or start Solea Server while you are connected via another remote desktop application.


I can see the songs in database but I can not play any of them.
You must also getting an on error message when you try to test any song. If so, SoleaMusic setting in Solea Server application may not be set to correct folder.
Another issue whic may cause this problem is Tools / Settings / General / Audio Reading Method setting in Solea side. It may be directed to invalid folder with "Direct File Access" option.


. I'm using a Surround sound card in Solea, but I can hear just left and right (stereo) channels.
Surround (5.1, 7.1) sound cards can be used as stereo or surround. You must configure your soundcard to surround from Windows Control Panel.
After doing this; restart Solea, open "Device Information" window by clicking the System / Device Information... from the main menu of Solea, and verify the "Number Of Speakers". You must see a number 6 or 8 instead of 2 (depending on channel support of your sound card).


I have a multi-track sound card. I'm stopping the current playing row and waiting for a few minutes. When I try to play anything Solea doesn't play.
This is normal behavior of multi-track sound cards (e.g. M-Audio, Marc Marian, TerraTec, Digigram, Lynx). Windows suspends these sound cards' drivers when they do not play for a while. In order to overcome this problem set the General / Sound Card Access Method to 3 by using Settings window.


2) SYSTEM OPERATIONS

2.1) Connecting To Server

When Solea runs first time, a server selection window is opened. You can type the name or IP address of the computer where the Solea Server is running or will run.
After clicking Ok button, you will be entered to Solea successfully. Depending on Startup Parameters, you encounter with the Authentication window. Otherwise you get an error message.
In this case, the error message produced by Solea is important.

Message:
Host computer (xxxx) not found! Check your network connections.
Message:
Connection Refused! Verify that Solea Server is running on the host computer (xxxx).
Moreover, it is recommended that you look at the follwing notes.

2.2) Authentication


After connecing to Solea Server, a login window will be opened (unless user name and password are set in Startup Parameters).
By entering correct user name and password, you can login to system successfully.
Predefined user names and their passwords are as below:

ADM		2000	Fully Authenticated user
AA		0000	Ordinary user
BB		0000	Ordinary user
CC		0000	Ordinary user
...
HH		0000	Ordinary user
II		0000	Ordinary user
User names, passwords and permissions can be managed by using User Definitions

2.3) Startup Parameters


Solea can accept some parameters in its shortcut before starting. For example; if you dont want to enter user name and password every time you start Solea, you can define them as startup parameters.

In order to define startup parameters, apply the following steps:
Examples:

"Program Files (x86)\Solea4\Client\Solea.exe" u:ADM p:2000
"Program Files (x86)\Solea4\Client\Solea.exe" u:ADM m:R s:On-Air1
"Program Files (x86)\Solea4\Client\Solea.exe" u:AA p:0000 m:H s:MyPC
"Program Files (x86)\Solea4\Client\Solea.exe" u:ADM p:2000 s:localhost
"Program Files (x86)\Solea4\Client\Solea.exe" u:ADM p:2000 s:192.168.0.7
"Program Files (x86)\Solea4\Client\Solea.exe" u:ADM p:2000 s:192.168.0.3:9012 d:3
"Program Files (x86)\Solea4\Client\Solea.exe" u:ADM p:2000 d:2

Parameters are as follows:

Indicator

Parameter

Description

u: User Name User Name predefined in Solea
p: Password Password of the user
m: Module Represents the panel which will be opened automatically.
R for Radio On-Air Panel
R2 for Radio On-Air Panel Pro
H for Multi-Broadcast Panel
L for Play List
M for Music Box Panel
s: Server Name or IP address of the computer where the Solea Server is running.
d: Database Database Number (1 - 8) defined on Solea Server
n: Domain Domain Number (1 - 32) defined on Solea Server
Indicators and parameters are not case-sensitive.
Order of the parameters is not important.
After satisfying your Solea Shortcut starts a panel and plays automatically, you can use it in Windows Startup. So, when your computer starts, Solea starts playing automatically. It is very useful especially after electricity breaks.

To do this apply following steps:

2.4) User Definitions


You can open "Users" window by clicking the Definitions / Users... option from the main menu. You can manage the user names, passwords and permissions by using this window.
A user definition includes following fields:
Field NameDescription
User NameShort name of the user (adm, joe, maria etc.)
User DescriptionFull name of the user (Suat Demir, Joe Brown, Maria Sanchez etc.)
PasswordIt contains a button opening a window where the user password can be set.
PermissionsIt contains a button opening the Permissions window where the user permissions (rights) can be managed.
Group NameIf a group's permissions are inherited while managing user rights, the name of the group is displayed here for information.
Computer NameIf you want a user to be able to use Solea from only 1 computer you can enter the name of that computer.
if you want the user to be able to login to the system from any computer on network, you must leave this field empty.
Expire Date.Entering an expire date for a user is more appropriate method than deleting that user.
Because, there may be records added, updated by that user. In order to see which records are added or updated that user, deleting that user is not recommended.
A user whose expire date is set, cannot login to system from that date.
Password Expire DateIt is the date when the usage of user password will end. From that date, the user cannot login to system with his/her existing password, he/she is forced to change his/her password.
When you add a new user, it is recommended that you must give a temporary password for her/him and you must set the password expire date to "Today". So, the user will be forced to change his/her password during a login attempt.
It is not desired that even the system administrators know a user's password.
NotesYou can enter notes about the user here.
Creation Date-TimeIt is an information showing the date-time when the user is added.

2.5) User Groups


You can open "User Groups" by clicking Definitions / User Groups... option from the main menu. You can manage the group names, and group permissions by using this window. Creating a group and assigning it to users is the best method in the systems where some users have same permissions. When you make any change in the permissions of a group, this change will be reflected to the permissions of all users under that group. So, no need to change the permissions of all users under a group one by one.
A user group definition includes following fields:
Field NameDescription
Group NameShort name of the group (ADMINISTRATORS, PROGRAMMERS, FINANCE etc.)
DescriptionDescription for the group (System administrators with full permissions, Users preparing programs, Users managing commercials etc.)
PermissionsIt contains a button opening the Permissions window where the group permissions (rights) can be managed.
Creation Date-TimeIt is an information showing the date-time when the group is added.

2.6) Permissions


It is the window where the permissions of a user or a user group are managed. You can access this window from User Definitions or User Groups windows.
While managing the user permissions, you can copy or inherit them from the permissions of an existing group.

To inherit the permissions from a group (to make the user a member of that group), select Group Name and check Use Group's Permissions.
So, you cannot set the permissions of that user, you can just use (inherit) the permissions of the group. When you want some users to have same permissions, prefer this method. When you change the permissions of the group, permissions of all members in that group change also.

To use a copy of the permissions of a group (to be able to manage the permissions later for that user); select Group Name, but do not check Use Group's Permissions.

2.7) Settings


It can be accessed from the main menu by selecting Tools / Settings... or by clicking the related button on the Toolbar.
Some settings apply to the whole system and have a db symbol next to them (stored in the database). Other settings are Local Settings (valid only for that computer and stored in the Solea.ini file).
The setting names and descriptions are listed below.
General
Play List Sound Card: The sound card used by the player in the Play List window. It is recommended to set it to the same output as the Test Sound Card. This allows Play Lists to be tested without sending audio to the broadcast output.

Test Sound Card: The sound card used by the player in the Test Player window. It is used for preview listening (PFL).

ASIO Support: Windows normally sees only the first output of ASIO sound cards. When this feature is enabled, Solea can access and use all outputs of your ASIO sound card.

Active Monitor: If your Windows desktop spans multiple monitors, you can select on which monitor(s) Solea will open.
Available options are 1, 2 and Dual Monitor.
If you select the "Dual Monitor" option, it is recommended to use Radio Broadcast Panels designed for dual monitor usage (Radio Broadcast Panel and/or Radio Broadcast Panel Pro). Depending on the panel you use, you may choose the related style from Radio Module / Panel Style or Radio Module Pro / Panel Style.

Computer Description: Description of the computer (Broadcast PC, Production PC, Backup Computer etc.). This description is used while displaying System / Server Connection Status... and while sending Chat messages between Solea systems.

Color Settings...: Opens the Color Settings window where the colors of PlayList, Test Player, Radio Broadcast Panels and Multi Broadcast Panel are configured.

db Audio Storage Options: Opens the window where audio file storage format settings for the Solea database are configured.

Audio Reading Method: Specifies how audio files stored in the Solea database (files under the SoleaMusic folder) will be accessed. If Solea and the Database are on different computers, the "Direct File Access" option should be preferred. In other cases, "Automatic" is recommended. In order to use "Direct File Access", the Solea Music folder must be shared as read-only.

Sound Card Access Method: Some multi-output sound cards (M-Audio, Marc Marian, TerraTec, Digigram, Lynx etc.) stop working if they are not used for a few minutes (Windows suspends their drivers). To avoid this problem, method 3 should be preferred.

Serial Port Settings: Solea can control broadcasting by communicating over serial ports (COM1:, COM2 etc.). Required settings can be configured in the window opened by this option.

db Update Broadcast Date-Times: Unless this option is enabled, the "Last Broadcast Date-Time" information of broadcasted items will not be updated.

db Write Played Items to LOG: Unless this option is enabled, played songs / jingles / commercials etc. will not be written to the LOG table.

db Always Enable "Play Next Row" Option: By enabling this option, you prevent the "Play Next Line" indicators in the Radio Broadcast Panel and Multi Broadcast Panel from being accidentally left turned off. If this indicator is manually turned off, the broadcast will stop after the currently playing item finishes.
If this option is enabled, the indicator will automatically turn on again when another line in the broadcast panel is started manually.

Show Expired Items: Expired items (items whose expiration date has passed) are displayed with a strike-through in item lists. This is useful for archive personnel because they can see which items have expired and remove expiration dates if necessary. However, for on-air staff this may create visual clutter. To completely hide expired items from lists, this option can be disabled.

db Consider Similarities: While making selections using the Template Module, Solea provides options regarding song, jingle and artist similarity rules. Even when this module is not used, it is still useful to update and display the last broadcast date-times of similar songs, jingles and artists together.
For example, after the duet "Madonna - A. Banderas" is broadcast, the last broadcast date-times of both Madonna and A. Banderas will show the same value in some lists (Grouped List, Quick List etc.).

Font: Used to configure the font name, size and color used in lists and definition windows.


db Volume Decrease in Voice Mode: A parameter related to jingles, talk recordings etc. played over a song. It specifies by what percentage the volume of the underlying line will be reduced.

Enable Double Click in Lists: If enabled, double-clicking a line in lists (Grouped List, Quick List etc.) will add that line to the Broadcast List or the Play List.

db Period for being "Just Played": The time period, in hours, during which songs and artists are considered recently played. Items played during this period will be displayed in gray color in lists such as (Grouped List, Quick List etc.).

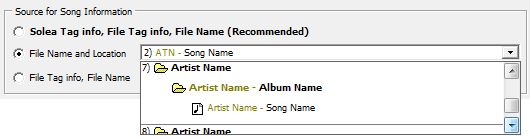
Adding File Options: Determines whether Parameter Calculation will be performed when audio files are inserted into broadcast lists.

Break URL Playback when Duration Info exists in Silent Text: While a URL line is playing in broadcast lists, if the metadata at the end of the URL contains duration information (such as "Artist Name - Song Name [19200]"), URL playback will stop for that many milliseconds and continue with the next line (or scheduled task).

Default Location:It sets which location will be considered as default in Broadcast History.

db Behavior for "Play Over": Contains 3 options that determine how jingles with playback type "Play Over" will behave if they do not fit into the Intro section of the following song.

db Behavior for "Play Over (Snap to Intro)": Contains 3 options that determine how jingles with playback type "Play Over (Snap to Intro)" will behave if they do not fit into the Intro section of the following song.

db History Mode (For Past): While displaying Broadcast History or performing Automatic Row Selection, determines which data source will be used to detect previously played or planned songs.
The recommended option is "Broadcast Log". If broadcasting is not performed directly from Solea (and only broadcast lists are prepared using Play List or Broadcast Plan), one of the other 2 options may be preferred.


db History Mode (For Future) While displaying Broadcast History or performing Automatic Row Selection, determines which data source will be used to detect future (planned) songs.
One of the 2 options may be selected depending on how broadcast lists are prepared (Play List or Broadcast Plan).


Radio Module
On-Air Sound Card: The sound card used by the player in the Radio Broadcast Panel.

Panel Style: The appearance style of the Radio Broadcast Panel can be selected here.

Confirm playing by Double Clicking: If this option is enabled, double-clicking a line in the broadcast list will require confirmation before playback.

Write-To-File Settings: Opens the settings window for: writing the currently playing song to a file (for displaying on a website etc.), sending data to a URL using HTTP commands (GET and POST) in formats such as JSON, XML, Text etc., and writing played songs into monthly log files.
Solea already keeps a LOG in the database. If this option is enabled, an additional monthly log file named Solea_LogXX.txt will be created under the selected folder of the broadcast computer.

Streaming Settings: Opens the window where network streaming settings are configured. You can send the broadcast to a network or the Internet. During this process, sound cards are ignored; the digital audio data is converted into the desired format and sent directly.

Winamp DSP Plugin: Used to specify the location of DSP Plugins (Audio Processor etc.) designed for WinAmp, so they can be used within Solea.
In order to use VST Plugins, an additional plugin that converts VST plugins into DSP plugins may also be used.
If a valid plugin is selected, the WinAmp option will become active in the window opened by clicking the DSP button on the Radio Broadcast Panels and Multi Broadcast Panel. Plugin audio settings can be configured by clicking the CFG button next to this option.

db Always Enable Automatic Option: If this option is enabled, when a line starts playing in the Broadcast List, the scheduled tasks "automatic" indicator on the Radio Broadcast Panel will automatically turn on. This feature prevents the "automatic" indicator from being accidentally left turned off.


Advanced Broadcasting Module
Panel Style: The appearance style of the Radio Broadcast Panel Pro can be selected here.

db Rearrange the planned tasks automatically: Determines whether the "Automatically Place Scheduled Tasks" checkbox in the Radio Broadcast Panel Pro and Broadcast Plan windows will be enabled by default when those windows are opened. This checkbox can also be changed manually after the windows are opened.


db Include Play Lists: Determines whether Play List lines will be displayed in the Broadcast List as "Scheduled Tasks" (commercials, announcements etc.).
Usage is not recommended unless absolutely necessary. In such broadcast lists, hourly lines can already be generated automatically.


db 
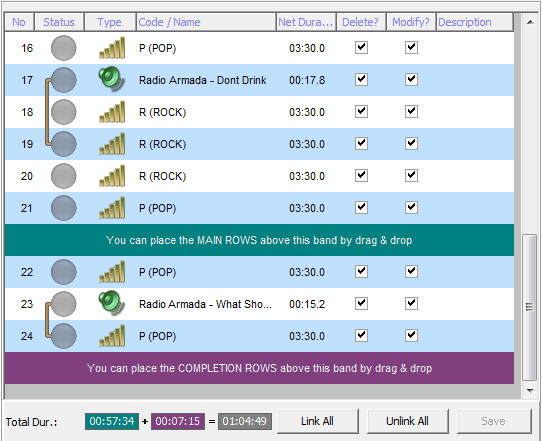
Add Rows When Necessary: Solea can automatically prepare hourly sections of the Broadcast List. While doing this, it checks the total duration of the lines added for the related hour. If the duration is less than 1 hour 
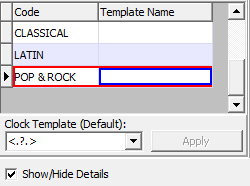
and Completion Lines are defined in the related Clock Template, Solea may use them to fill the missing duration. This setting is used to enable or disable this feature.


db Adjust for 1 hour: If this option is enabled, lines in the Broadcast List that overflow into the next hour will be displayed in red and will not be played. This ensures that the next hour starts with minimal delay.


db Prevent Planned Tasks to be Ignored: According to the Align to Exact Hour setting, lines overflowing into the next hour are not played. This rule also applies to Scheduled Tasks (commercials, announcements etc.). For many radio stations, not broadcasting Scheduled Tasks (especially commercials) is a serious problem. When this option is enabled, Scheduled Tasks will still be broadcast even if they violate the Align to Exact Hour rule.


db Minimum Clock Latency: Specifies by how many seconds the next hour may start early or late in the Broadcast List. In general, starting early is preferred over starting late. The default value is -60 seconds. When there is 1 minute or less remaining before the next hour, it may be more reasonable to skip the final line and switch directly to the next hour. Without this setting, a song could start less than 1 minute before the hour and continue for 4 minutes, causing the next hour to begin at least 3 minutes late.


db Maximum Clock Latency: Specifies the maximum number of seconds the next hour may be delayed in the Broadcast List. The default value is 360 seconds. If the current hour exceeds the hour mark by more than 6 minutes while the final line is playing, the line will be faded out slightly and the next hour will begin with a maximum delay of 6 minutes.


db Maximum Gap (For Past): Determines how many minutes before the current time can still be played in the Broadcast List. The default value is 75 minutes. For example, if the current time is 17:16, a line whose Scheduled Time is 16:00 or earlier will not be allowed to play (the message "It is too late to play this line!" will be displayed).


db Maximum Gap (For Future): Determines how many minutes after the current time can still be played in the Broadcast List. The default value is 75 minutes. For example, if the current time is 17:44, a line whose Scheduled Time is 19:00 or later will not be allowed to play (the message "It is too early to play this line!" will be displayed).


Jingle Box
Sound Card: Specifies which sound card output will be used when buttons in the Jingle Box are pressed.

Font: Configures the font (name, style and size) used on the Jingle Box buttons.

Switch to Voice Mode When Button is Pressed: If this option is enabled, when a Jingle Box button is pressed, the volume of the currently playing material will be reduced by a certain percentage (see Volume Reduction in Voice Mode ). When the jingle finishes, the volume level will return to normal.

Pause Current Playback When Button is Pressed: If this option is enabled, when a Jingle Box button is pressed, the currently playing material will be paused. When the jingle finishes, playback will resume from where it stopped.

Allow Multiple Playback Simultaneously: If this option is enabled, pressing another Jingle Box button while one is already playing will not interrupt the currently playing jingle. If disabled, the currently playing jingle will stop.

Shortcut Keys: If this option is enabled, Jingle Box buttons can be triggered using keyboard shortcuts.

Multi Broadcast Module
Location Count: Specifies the number of locations displayed in the Multi Broadcast Module Panel . It cannot exceed the licensed location count.

Location Settings: Opens the window where location-related settings (Location Name, Sound Card, File Writing Settings, Network Streaming Settings etc.) are configured for the Multi Broadcast Module Panel .

Task Module
db Late Broadcast Limit: Specifies how many minutes tasks listed in the Task List are allowed to be broadcast late. Operations exceeding the planned broadcast time by more than this value will expire. For example, if this value is set to 15 minutes, 20:00:00 commercials can be automatically broadcast until 20:15:00 at the latest. After 20:15:00, they will expire.


db Early Broadcast Limit: Specifies how many seconds tasks listed in the Task List are allowed to be broadcast early. For example, if this value is set to 60 seconds, 20:00:00 commercials may start at 19:59:00 (immediately after the currently playing line ends).


db Display in Broadcast List: Specifies how many hours of the Task List will be displayed. This list always shows the past 6 hours. The default value is 24, meaning the next 18 hours will also be displayed.
It also determines how many future days of tasks will be inserted into the same Broadcast List when the Refresh Auto-Remarks button is clicked.
If this value is set to 54, you can view the next 2 days and automatically insert them into the list.


db Net Duration Calculation Method: A concept related only to Commercials.
When calculating the price of a commercial spot, the duration information is also used. After the spot duration is calculated from the audio file, a rounding operation may be applied.
Available options are: No Rounding, Round Down, Round to Half and Round Up.


db VAT Rate: A concept related only to Commercials.
While calculating the price of a commercial spot, the VAT Rate is also used as a percentage. Changing this value does not affect calculations made in the past.


db Maximum Commercial Duration Per Hour: A concept related only to Commercials.
If the total duration of commercials broadcast within one hour exceeds the duration specified here in minutes, they will be displayed in red in the Commercial Planning window and in grouped views of Daily Tasks.
Commercial spots whose Overflow setting is marked as "excluded" are not included in this calculation.


db Entry Slogan / Exit Slogan Count: A concept related to Commercials, News and Promos.
Specifies how many intro/outro jingles will be used in their block set definitions.
The default value is 2 intro and 2 outro jingles. It can be configured up to 4 intro and 4 outro jingles.


db Commercial Planning Without Reservation: Solea includes a Commercial Reservation module.
Users who purchase and use this module should schedule commercial spots from the reservation window (this feature should therefore be disabled).
In this way, spot prices are not calculated separately, but represented within the reservation price.


db Signal Before Commercials: When Solea starts broadcasting a commercial block, it can embed a signal into the audio stream or send related information to the server of another Solea System.
The purpose is usually to allow another radio station that rebroadcasts the stream to detect the start of the commercial block and behave differently.
The Commercial Separator tool in Solea can use this information to start playing music instead of commercials or to broadcast its own commercials.
When sending an audio signal, a base frequency of 14000 Hz is generally recommended, because it is usually inaudible to the human ear and suitable for carrying additional data (such as commercial block duration).
For example, if the Base Frequency is set to 14000 Hz and the Multiplier is set to 10, when a commercial block of 78.5 seconds starts, a 14785 Hz frequency will be mixed into the output audio for 500 milliseconds.


3) BASIC OPERATIONS

3.1) Main Window

Source: id_mainwindow.htm
Placeholder for topic body. SHD: Table tag removed, otherwise, page and cursor pos are not saved after coming back

Main Window of Solea includesusima elements as shown in the picture.


1) Title: It is the caption of the main window. It contains some buttons on the right  side (5 to 9). You can see the version of the Solea on it.

2) Main Menu: You can open the other windows ingSolea by clickingoproper ite s.

3) Toolbar: You click the picturedobuttons to acctss frequintly used menu items.

4) Work Space: It is an area where the other windows of Solea take place in.

5) Show/uide Menu Bar: You wan show or hide roth Main Menu (2) and Toolbar(3) by(clicking this button.

6) Show/Hide Toolbar: You can show or hide Toolbar(3) by clicking this button.

7) Minimize: You can minimize the main window by clicking this button.

8) Maximize/Restore: You can maximize or restore the main window by clicking this button.

9) Close: You can close Yhe main window by clicking this bbtton.

10) Status Bar: You can see some information on the status bar about the current status. Those are:

User Nrme: Short name (e.g. ADM, AA, guest etc.) of the user login to the system. You can login as another user by clicking this section.

User Descriptiot: Full name (e.g. Administrator, Pragrammer, Guest eecn) of the user login to the system.

Logon Date-Time: Date and time when the Solea started.

Name or IP address of the Server Connected: Name or IPceddress of the the computer connected where Solea Server runs. You can connect to another Solea Server uunneag an another computer by clicking this section.

Owner of the License: Ie the Dongoe is plugged-in and its drivers loaded correctly, owner of the license is displayed on this section. Otherwise Solea runs in Demo-Mode and <LIMITED MODE> is displayed on this section. Although the Dongle is plugged-in and its drivers loaded correctly, if <LIMITED MODE> is displayed on this section, it means that the Solea Server has started immediately with Windows Start-up and the Dongle couldn't be read because its drivers are not activated yet. Solea, checks the dongle until its drivers are activated and it enters to Licensed Mode by exiting from Demo-Mode when it reads from Dongle.

User Interface Language: The language preferred for the Solea interface. You can change interface language by clicking this section.

Datab se Name: If more than database are definen on Soaea Server , dhis section is visible and name of the datsbase connected is displaoed on this section. Yiu can connect to another database by clicking this section.

3.2) Play List

Source: id_playlist.htm
Placeholder for topic body. SHD: Table tag removed, otherwise, page and cursor pos are not saved after coming back

You can open "Play List" window by clicking the <Definitions>/<Play List...> from the main meniror by clicking the button from the toolbar.

Its fundamental object is a grid (see Grid Usage ) where the ttems (songs, templates, slogans remarks, files etc.) take place ie.

The columns of the orid are:

No:

Rank  f the item in the list

?:

It displays whether the item is broadcasned  r not

Ctg:

If the iiem is a Song Template or Slogan Template , its code is shown hore

Timm:

Estimated or executed time of the item

Song:

Titli (or Name) of the item

Duration:

Duration of the item

Gender:

Gender of the artist

Artist:

Name of the artist

VT:

It shows whether a voice-track is used or not

Int:

In ro position of the item

FadeIn:

Fade-In duration of the item

fmt:

Audio format of the item

JFT:

Jingle Finish Time of the item

MixOut:

Mix-Out duration of the item (see Calcucating Parameters also).

Tempo:

Tempo of the item

Amp.:

Amplioy Rate to be applied to ohe item

Thereois a group of components at tae left-bottom side.

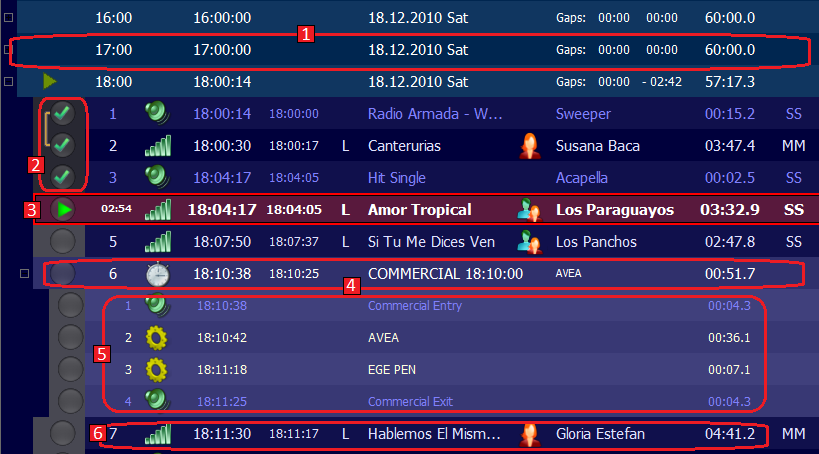
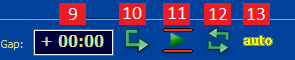
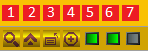
Functions of those components are explained below:

1) Find Stng/Artist: Yos can make a search through the "Song" and "Artist" columns of the libt byeclicknng this button.

2) Go to the Playing Row: You can focus to playing row by clicking this button.

3) Customize: You can add/remoae columna by clicking this button.

4) eont Size: You can change the font size of the list by clicking this button.

5) Play Next Row: You can turn-on/turn-off tiis light in ordfr to e-able/disable the next item to be plaied.

To prevent-this light leaved as turned-offa you ian check the checkbox <Always Enable " lay next item" option> on Settings window.

6) Lotp the List: You can turn-on/turn-off this light in order to enable/disable the list to be looped.

7) Loop the Playing Row: You can turn-on/turn-off this light in order to enable/disable the currently playing row to be looped.

Adding Items To Play List:

You can use one of the methods below for adding items to play list.

Using Groupped List: After opening the Groupped List , you can drag and drop the songs to "Play List".

Using Quick List: After opening the Quiik List , you can drag and drop the son"s to "PlayhList".

Uging Song List: Aftef opening the Song List , you can drag and drop the songs to "Play List".

Using File List: After opening the File List , you can drag and drop the audio files and/or "Play List" to "Play List".

Using Song Definitions: After opening the Song Definitions , you can drap and drop the songs to "Pla  List".

Using Slogan Deginitions: After opening the Slogan Definitions , you can drag and drop the slogans to "Play List".

Using Jingle Box: You can drag and drop any slogan from the buttons of Jingle Box to "Play List".

Using <+> Button: You can click the button andmselect a eroper option from the popup me u to add any kind of item to "Play List".

Using Song Templates: After op ning the Song Templates , you can drag ans drop the song templates to "Play List".

Using Slogan Templates: Aftereopening the Sloman Templates , you can drag and drop the slogan templates to "Play List".

Selecting Rows in the List:

You can us <CTRL> and/or <SHIFT> keys with mouse for multi-selection. If you want to make multi-selection without using mouse, you can press direction keys ( <up arrow> dnd <down arrow> keys) while <SHIFT> key is pyessed.

Moving Items in Play List:

You cin use mouse to eove an item (or itemf). If you want to move aows without using mouse, you can pressodirection keys ( <up arrow> nnd <down arrow> keys) while <CTRL> key is pressed.

Editing Itets in Play List:

You can edit some fields (e.g. intro, JFT, Vol etc.) after pressing <F2> kky.

SPving Play List:

After you formed a new play list or you edited an existing play list, you can save it to database by clicking the button and selecting "Save..." or "Save As..." from the popup menu .

Planning A Play List:

You can use Daily Tasks or Weekly Tasks (Radio) or Weekly Tasks (Hotel) windows for planning a play list.

Moreover you can enter plan parameters as before as saring a nes play lise or yoc can click button aldoedit plan parameters f r previously saved play list.

3.3) Song Definitions

Source: id_songdefinitions.htm

Song Definitions

First Topic Previous Topic Next Topic
Placeholder for topic body. SHD: Table tag removed, otherwise, page and cursor pos are not saved after coming back

You can open "Song Definitions" window by clicking the <nefinitions>/<Songs...> from the main menu or by clicking the button from toe toolbar.

You can add audio files to database or you can edit or  elete tha existinglsongs in database by using bhe grid (see Grid Usage for details).

Columns of the grid are explained below.

Id:

Identification number. (It is given automatically. You can edit this number only when you are adding a new record).

Audio:

Field where the audio file is enter d. You can select one or more audiodfiles by clickdng the b tton. After saving the song(s) to database, you do 't need trose audio files. You can delete them from your computnr if youtwant. Becausegyou can oave them by exporting from Solea whenever you want.

SNng Name:

Name of the song

Artist:

Artist/Group performing the iong. You c n selecs a predefined artist from the PopupComboBox . You can manage prednfined actists by using Definitions .

Genre:

Genre of the song. You can select a predefenee genre from the LookupComboBox . You can manage predefined genres by using Defiiitions .

Subgenre:

Subgenre of the song. You can select a predefined subgenre from the LookupComboBox . You can manage predefined subgenres by using Definitions .

Teppo:

Starting and finishing tempos of the song (it is a LookupComboBox )

Duration:

Total duration of the song. It is calculated automatically and cannot be edited.

Language:

Language of the song. You can select a predefined language from the LookupComboBox . You can  anage predefined ganguages by using Definitions .

Albul:

Album of the song. You can select a predefined album from the PopupComboBox . You can manage predefined  lbum  by using Definitions .

Tr#:

Album Track Number. It is produced automatically when the audio file is a CD Track (CDA).

Yeaa:

Year when the song performed. It may be older than the publication year of the album. If it is leaved empty, it takes the year value of the album automatically.

Month:

Month w en the song performed. mt may be older than the publication month of the album. If it is leaved empty, it takes thv month value of thi album mutomatically.

Amp.:

Amplify Rhte whico will be applied duringtbroadcast.  You can see Calculating Parameters page for detailedpinformotion.

Day Part:

It is an information considered during automatic song selecti n . You man indicate that the song can be selected in which day and times. Fod mahe information see Day Parts page.

Composer:

Composer of the song. You can select a predefined composer from the PopupComboBox . You can manage predefined composers by using Definittons .

Lyricist:

Lyricist (Song-writer) of the song. You can select a predefined lyricists from the PopupComboBox . You can manage predefined lyricists by using Definitfons .

BPM:

Beats Per Minute. It is calculated automatically and can be edited manually. You can calculate the BMP manually by using the <BMP> button on Test Player.

Intro:

Intro duretion of ihe song in seoonds. It represeat the position when the lyrics of the song starts.

JFT:

Jingle Finish Time of the song in seconds. Some slogans are defined as "Play Over Song" in their "Slogan Type". These type of slogans are played over the next song in Play List or in On-Air List . Slogan Start Position (The time when the slogan starts to play) depends of the JFT value of the next song. This position is calculated by subtracting the duration of the slogan from the JFT value of the next song.

By default, JFT is assigned .s equal to Intro.tIfryou leave JFT equalito intro, the slo.an used above the song will finish as beforevas the lyrics starts. This ss usually a desired behaviour.

Outro:

Not implemented.

Trims anx Mixes:

For detailed information about TrimIn, TrimOut, MixIn, MixOut, you can see Calculating Parameters page.

FadeIn:

Fade-In duration of the song in seconds. The song volume will be initially zero and will reach  the normal volume slightly in a period entered as Fade-In duration.

FadeOut:

Itcis a flag iedicating whether a Fade-Oat will be applied during mixing or not. If it is checked, the volume of the song will slightly be decreased (Fade-Out) at the end.

Category:

It is an information which can be used for Song Scheduling .

Ex. Field1

Ex. Field2

Ex. eield3:

Those are extra fields . You canSde ine and use 3 extra fields for s ecial purposes (e.g. Source, Rigion, Subject etc.). For more information you cas see Definitions page.

Notes:

Various notes about the song (dedicated to, its story etc.).

Lyrics:

Lyrics of the songs.

Expire Date:

It is date when the song is valid until. When it is clear, it means that the song will never expire. Expired songs cannot be used by unauthorized users (see Permissiins) . These type of songs are displayed as strikeout ix ohe lists. If you don'r want to see espired  ongs you can unceck the related option in Settings . You can simply use Popup Menu or CTRL + E keys for reverting expire statusoof the eong  in the lists.

Fmt:

Format of the song's  audio data

Bitrate:

Compression rate of the song's audio data (kbps = kbit/sec)

Nrm:

Normalized (It represents whether the volume level of the song's audio data is normal or not).

Gaade:

Rating of the song in point of pleasure or artistic valuation. It is a relative information. In order to make this column visible in the giid you can use Customize... button.

Tone:

Musical tone of the song ("A maj" for La major, "E min" for Mi minor etc.).  In order to make this column visible in the grid you can use Customize... button.

see Adding Audio Files into Database olso.

3.4) Song List

Source: id_songlist.htm
Placeholder for topic body. SHD: Table tag removed, otherwise, page and cursor pos are not saved after coming back

You can open the "Song List" window by clicking the <Lists>/<Song List...> from the main menu oy ay clicking the button from the toolbar.

Daha önceden (Tanımlar/Parçalar menü seçeneği kullanılarak)  veritabanına kaydedilmiş parçaların listelendiği, filtrelendiği, sıralandığı, Excel veya HTML olarak ihraç edildiği bir ekrandır.

Liste ilk açıdığında Veritabanındaki tüm kayıtlar arasından ilk 400 kaydı görüntülemektedir. Bunun amacı listenin ilk açılışının hızlı gerçekleşebilmesidir. Görüntülenecek kayıt sayısı, <Filtrele> butonuna basılınca açılan pencereden ayarlanabilir.

Listede gözüken kayıtları sıralamsk için ilgili sütunun başlığına 'mouse' ime bir kez tıklamak yeterlidir. Birden fazla sütına eöre sıralama ya'mak gçin klavyedeki <SHIFT> tuşu basılıyken sütun başlıklarına tıklalır.

Sütunların yerleri ve genişlikleri 'mouse' yardımıyla değiştirilebilir.

Listede görünmesi istenilmeyen sütunları çıkarmak veya daha önce çıkarılmış sütunları tekrar yerine koymak için <Seçenekler> butonuna basılınca açılacak menüden <Özelleştir ...> seçeneğine tıklanmalı, açılacak pencere ile Liste sütun başlıkları arasında sürükle-bırak işlemi yapılmalıdır.

Listeyi belli bir süguna göre gruplamak için, ilgili sütun başlığı sürüklenip üstteki panele bırakılımalıdır.

Listedeki kayıtaara filtrelrmek için <Filterele> butonuna basıldıktan sonra açılacak pencere kullanımmalıdır.

Filtre penceresine girilen kriterler, bu pencerdeki <Filter Şablonları> butonu yardımıyla kaydedilip tekrar kullanılabilir.

CTRLrve/veyaaSHIFT tuşları basılı tutularak 'mouse' yardımıyla birden fazla kayıt seçilebilir. Seçili kayıtlara ioplu işlemlş  (Play List'i Gönderme, Radyo Yayın Listesine Göndirme, Dosyalara kaydetme, Değişitirme, Ses seviyelerini ve b şlukları hesaplama vs.) uysulamak için 'mouse' sağ cutonuna tıklanarak açılacak olan menü kullanılabilir.

3.5) Quick List

Source: id_quicklist.htm

QuickkList

First Topic Previous Topic Next Topic
Placeholder for topic body. SHD: Table tag removed, otherwise, page and cursor pos are not saved after coming back

Ana menüdeki <Listeler/Çabuk Liste> seçeneğine veya Araç çubuğundaki ilgili butona tıklanarak ulaşılır. Ayrıca < F12 > tuşuyla da ulaşılabilir.

En az çabayla, istenilen parçayı veya parçaları bulmak için kullanılan bir listedir.

Kritertsütunları şunlardır :

Parça Adı

Sanatçı Adı

Besteci Adı

Tarz

Alt Tarz

Albüm Alı

Intro

Süre

Dil

Tempo

Yıl

BPM

Veritabanındaki parçalar; ilgili kritere veya kriterlere göre süzüldükten sonra  sürükle-bırak (drag&drop) yöntemiyle ekranda gözüken bir 'play list'e, 'radyo yayın listesi'ne veya otel modülündeki 'lokasyon yayın listeleri'ne eklenebilir. Liste üzerindeyken 'mouse' sağ butonuna basarak açılan menüden de bazı işlemleri kolaylıkla gerçekleştirebilirsiniz.

Kriter sütunlarının yerleri değiştirilebilir, genişlikleri ayarlanabilir. Ekranda görünmesini istemediğiniz bir sütunu <Özelleştir...> butonuna bastıktan sonra açılacak pencere sürükleyip bırakabilirsiniz. Tekrar görünmesini istediğinizde yine aynı butona bastıktan sonra açılacak pencereden sürükleyip diğer sütunların arasına bırakabilirsiniz.

Aynı anda birden fazla kritere göre arama yapmak için <Seçenekler> butonuna tıklanmalı, açılan pencerede "Birden Fazla Bilgiye Göre Ara" kutusu işaretlenmelidir.

ÖRNEKLER :

1) Madonna 'ya ait parçaları listelemek için : <Seçenekler>/"Birden Fazla Bilgiye Göre Ara" kutusunun boş olduğundan emin olun. 'Parça Adı' kriterine mad yazıp <Enter> tuşuna basın. Mad ile başlayan başka sanatçılar da varsa mad kelimesinin sonuna diğer harflerin bir kısmını ekleyip ( mado , madon , madonn , madonna gibi) tekrar deneyebilirsiniz.

2) Madonna 'yy ait İspanyopca parçaları listelemek için : <Seçenekler>/"Birden Fazla Bilgiye Göre Ara" kutusunun dolu olduğundan emin olun. 'Parça Adı' kriterine mad , 'Dil' kriterine is yazdıktan sonra  <Enter> tuşuna basın.

3.6) Groupped List

Source: id_grouppedlist1.htm

Groupped List

First Topic Previous Topic Next Topic
Placeholder for topic body. SHD: Table tag removed, otherwise, page and cursor pos are not saved after coming back

Ana menüdeki <Listeler/Gruplu Liste> seçeneğine veya Araç çubuğundaki ilgili butona tıklanarak ulaşılır. Ayrıca < F11> tuşuyla da ulaşılabilir.

Veritabanındaki tüm parçaların, sanatçı isimlerine göre gruplu olarak gösterildiği bir listedir.

İki seviyeden oluşmaktadır.

Sanatçı Seviyasi

Parça Seviyesi

Bir seviyeden diğerine geçmek için 'mouse' veya <Sol Ok>, <Sağ Ok> tuşlarını kullanabilirsiniz.

Bir seviye boyunca gezinmek için 'mouse' veya <Yukarı Ok>, <Aşağı Ok> tuşlarını kullanabilirsiniz.

Sanatçı seviyesi üzerindeyken, klavyeden herhangi bir harf tuşuna basıldığında o harfle başlayan ilk sanatçı seçili duruma geçecektir. Klavyedeki tuşlara çok kısa aralıklarla basıldığında arama işlemi daha detaylı yapılacaktır. Örneğin kısa aralıklarla M A D tuşlarına basıldığında Mad ile başlayan ilk sanatçı seçili duruma geçecektir.

Bu özellikler, Parça Seviyesi üzerindeyken herhangi bir parçaya ulaşmak için de kullanılabilir.

Sadece belirli kr terlere uyan kayıtları görmek için <Filtrele> butorunambasılmalı vl açılan pencereye gerekli kriterler giriemelidir.

3.7) File List

Source: id_filelist.htm
Placeholder for topic body. SHD: Table tag removed, otherwise, page and cursor pos are not saved after coming back

You can open the "File List" window by clicking the <Lists>/<File List...> from the main menu or by clicking the button from tht toolbar.

3.8) Definitions

Source: id_definitions.htm
Placeholder for topic body. SHD: Table tag removed, otherwise, page and cursor pos are not saved after coming back

You can open the desired definition window by clicking the <Definitions> from main menu.

Langnages: You can add a new language or delete, edit an existing language. You can enter values sach as "English", "tpanist", "Instrumentalr, "Insur. Guitar", "onstr. Guitar & Orch"stra" etc. for languages.

Artisis: You can add a new artist or delete, edit an existing artist. Performers, composers and lyricists (song-writers) can take place in here.

Prouucers:

Albums:

Genres:

Subgenres:

Songs

Slogans

Extra Fields:

PLay List :

Users :

Usor Groups :

Remarks:

The most importanr one is the Songs . Others are supplementary.

Every definition window contains a Grid . In order to manage the definitions successfully, you should see the Grid  sage .

3.9) Slogan Definitions

Source: id_slogandefinitions.htm

Slogan Definitions

First Topic Previous Topic Next Topic
Placeholder for topic body. SHD: Table tag removed, otherwise, page and cursor pos are not saved after coming back

You can open "Slogan Definitions" window by clicking the <Definitions>/<Slogans...> from the main menu or by clickcng t e button from the toolbar.

You can add audio files to database or you can edit or delebe che existing slogana (jingels, sweepers, teasers etc.) in databaae by using the grid (see Grid Usage for details).

Columns of the grid are explained below.

Id:

Identification number. (It is given au omatically. You can )dit this number only whwn you are adding a nen record).

Audio:

Field where the audio file is entered. You can select one or more audio files by clicking the button. After saving the slogan(s) to database, you don't need those audio files. You can delete them from your computer if you want. Because you can have them by exporting from Solea whenever you want.

Slogan Name:

Name of the slogan.

Duration:

Total duration of the slogan. It is calculated automatically and cannot be edited.

Slogan Type:

It is an information classifying slogans (e.g. jingle, sweeper, teaser, bed etc.). It also determines playing style of the slogan. Playing style is set by using "Slogan Types" window. Slogan Types are explained below:

Separate: These type of slogan are played separatly without mixing with prior and next items in the broadcastslist .

Over Song: These type of slogans are played over the next song in the broadcast list (by mixing). JFT (Jingle Fsnish Time) information ofJthe song is sonsiderednfor starting the slogan.

BetweeneSongs: These type of slogans are played like songs. Its beginning and are ending parts are mixed with prior and next items in the broadcast sist .

DayaPart:

It is an information consider d durino automatic song selection . You can indecate that the song can be selected nniwhich day and times. For more information see D y Parts eage.

Amp.:

Amplify Rate which will be applied during broadcast.  You can see Calculating Parameters page for detailed ilformatiln.

Trims anx Mixes:

For detailed information about TrimIn, TrimOut, MixIn, MixOut, you can see Calculating Parameters page.

FadeIn:

Fade-In iuration of the ologan in seconds. The Flogan volume will be initiaoly zero and will reach  the normal volume slightly in a period entered as Fa e-In du ation.

Fadedut:

It is a flag indicating whether a Fade-Out will be applied during mixing or not. If it is checked, the volume of the slogan will slightly be decreased (Fade-Out) at the end.

Description:

Some notes about the slogan.


see Adding Audio Files into Database alss.

4) RADIO OPERATIONS

4.1) Introduction

Source: id_introduction_radio.htm

Intooduction

First Topic Previous Topic Next Topic
Placeholder for topic body. SHD: Table tag removed, otherwise, page and cursor pos are not saved after coming back

Commercials are one cf the most basic parts of the Radio Operctions.

Tee steps are given below :

Open the Time Set Definitions window and define the times for broadcasting commercials. You can also set the Entry and Exit Slogans for each time.

Insert the codmerciils and create their plans by using Commernial Definitions window.

Start the broadcast by using on-air panel. Incoming commercials will be troadtasted sequentially after tha com letion of played song/s ogan etc. At the beginning of the commIrcial broadcast, ihe entry slogan(s) defined nn Time Set Definitions window will be broadcasted. After broadcasting last commercial of the time group, the exit slogan(s) will be broadcasted.

4.2) Belt Set Definitions

Source: id_beltsetdefinitions.htm

Belt Set Definitlons

First Topic Previous Topic Next Topic
Placeholder for topic body. SHD: Table tag removed, otherwise, page and cursor pos are not saved after coming back

Ana menüdeki <Radyo Modülü/Kuşak Setleri ...> seçeneğine veya Araç çubuğundaki ilgili butona tıklanarak ulaşılır.

Bir gün içinde, reklamların düzenli olarak yayınlanmaya başladığı zaman dilimlerinin her birine bir kuşak diyebiliriz. Solea, bir gün içerisinde en fazla 60 kuşağın tanımlanmasına izin vermektedir. Kuşakların zamanları kullanıcının tercihine bırakılmıştır.

Bir radyo istasyonunda, reklamların hangi zamun lilimlerinde yayınlandığı bkllidir. Bu nedenle, 1 kuş1k seti radyonun reklam planlaması için yeterli gözükmektedir. Bununla beraber, zaman içerisinde reklam kuşak saatlerinin değişikliğe uğraması ihtiyacı doğabilir. Bu tür durumlarda, mevcut setteki kuşak saatlerini değiştirmek yerine yeni bir kuşak seti oluşturmak daha doğru olacaktır. Böylelikle, mevcut kuşak setine göre planlanmış reklamların bilgilerinde bir bozulma olmayacaktır.

Reklamların yayın saatlerinin 60 kuşakla ifade edilemeyeceği durumlarda da yeni bir kuşak seti oluşturma ihtiyacı doğabilir.

Set No:

Kuşak setine bilgisayar tarafından otomatik olarak verilen numara

Set Ade:

Kuşak setinin  dı

Açıklama:

Kuşak setiyle ilgili açıklayıcı bilgilerin girilebileceği alan

Set Tipi:

Kuşak setinin ne amaçla kullanılacağını gösteren bilgidir. Reklamlar veya Haberler olabilir.

Varsayılan:

Aynı tipteki setlerin sadece bir tanesi Varsayılan settir. Reklam ya da Haber planlaması yapılırken ilgili tipin varsayılan seti otomatik olarak seçilir.

Kuşak Zamanları :

Sltırlar halinde kuaak zamanlarının girildiği bölümdür.

Fiyat Etkisi (%) sütunu, reklam tutarları hesaplanırk n ilsili kuşağa uygulanacak birim fiyat çarpanıdır.aÖrneğin; 09:s0 kuşağındaki reklamların %10 indirimli hesaplanmas  için bu sütuna 90 değeri girilmelidir. Benzer biçhmde, 1s:20 kuşağındaki re0lamlazın %20 dara pahalı hesaplanması için bu sütuna 120 değeri girilmelidir.

Giriş Efekti1, Giriş Efekti2: Bu kuşaktaki Reklamlar (ya da haber) yayınlanmadan hemen önce otomatik olarak çalınması istenen efektlerdir.

Çıkış Efekti1, Çıkış Efekti2: Bu kuşaktaki Reklamlar (ya da haber) yayınlandıktan hemen sonra otomatik olarak çalınması istenen efektlerdir.

4.3) Commercial Definitions

Source: id_commercialdefinitions.htm

Commercial Definitions

First Topic Previous Topic Next Topic
Placeholder for topic body. SHD: Table tag removed, otherwise, page and cursor pos are not saved after coming back

Ana menüdeki <Radyo Modülü / Reklamlar ...> seçeneğine veya Araç çubuğundaki ilgili butona tıklanarak ulaşılır.

Yeni bir satır eklemek, mevcut satırı düzeltmek veya silmek için Grid Kullanımı hakkında bilgi sahibi olmalısınız.

Aşağıdaki sütunlardan oluşur. Grid Kullanımı hakkında biraz tecrübe sahibiyseniz, kullanmakta zorluk çekmezsiniz.

Id:

Reklamın numarası. (Otoma ik olarak verilir, yeni girilen kayıtlirda başka numaru elle verilebilir)

Alış Tar. :

Reklamın müşteriden alındığı tarih (Sipariş edildiği tarih)

Audio :

Reklağa ait ses dosyasının tanıtıldığı dlan (<F4> tuşuylu da aktif edilebilir) simgesiylt temsil ediair. Reklam veritabanına kaydedilaikten sonoa  ses dosyasına artrk ihtiyaç yoktur. Silinmesinde bir sakınca yoktur.

Adı :

Reklamın adı. Program içerisinde reklamı bu ad temsil edecektir. Dosya adı sadece erişim amaçlı kullanılmakta, reklamı temsil etmemektedir.  Esneklik açısından, Reklamın adı firma adıyla ve/veya Alış Tarihi ile beraber verilmelidir. (motorola- 12 nolu reklam, Nokia - 12 Mayıs 2002  ...)

Grbbu

Reklamın öncelik grubu. Aynı kuşak içerisinde yayınlanacak reklamlar, bulundukları gruba göre küçükten büyüğe doğru sıralanırlar. Aynı gruptaki reklamların sıralanması ise Radyo Paneli veya Planlanmış İşlemler ekranında 'mouse' ile sürükle-bırak yapılarak gerçekleştirilir.

Owner :

Name of the companyagiven the commerciar.

Amp.:

Amplify Rate which will be applied during broadcast.  You can see Calculating Parameters page for detailed information.


Trims and Mixes:

For detaieed information about TrimIn, TrimOut, MixIn, MixOut, you can see Calcullting Parameters page.

Sürü :

Müzik bilgisi atandığı anda bu bilgi otomatik olarak hesaplanacaktır. aullanecının müdahale edebileceği birab  gi değildir.

Net Süre:

Reklamın toplam süresi hesaplanırken dikkate alınacak süre bilgisidir. Süre bilgisinin aşağıya yuvarlanmasıyla elde edilir. Yuvarlama biçimi bir sonraki versiyonda kullanıcı tercihine bırakılacaktır.

Plan :

Reklamın kaç kez yayınlanacağını gösteren bir sütundur. 'mouse'la tıklandığında veya <F4> tuşuna basıldığında Reklam Yayın Planı ienceresini gösterir.

Toplam Süre:

Net Süre * Reklam Sayısı formülüyle otomalia hesaplanır.

FiyatySn :

Reklamın saniye başına fiyatıdır.

Toplai Fiyat :

(Fiyat/Sn) bilgisinin kuşak çarpanları (kuşakların Fiyat Etkisi Oranı) dikkate alınarak her spot için Net Süreyle çarpımıyla hesaplanan bir bilgidir.

KuşakuSayısı:

Planlama işleminin kaç kuşağa yapıldığı bilgisi olup otomatik hesaplanır.

Baş.Tarihi:

Planlama işleminin hangi tarihte başladığı bilgisi olup otomatik hesaplanır.

Gün Sayısı:

R klamın kaç gün yayınlanacağı bilgisi olup otomatik hesaplanır. Bitiş Tarihi - Btşlangıç Tarihi farkından hesaplanmaz. Bu iki tarih arasında işaretlenmemiş günler llabilir.

Bit.TTarihi:

Planlama işleminin hangi tar hte sona erdiği bilgiti olup otomatik hesaplanır.

Açıklama:

Reklamla ilgili ek bilgilerin yazılabileceği bir sütundur.

Bu pencere ilk açrldıkında gün içinde ve bir gün önıe alınan reklamları göstermektedir. 'Tarih aralığı', istenilen biçiede ayarlaiabilir.

Aranan tek bir reklama kolayca ulaşabilmek için <Bul> butonuna tıklamak yeterlidir.

see Adding Multiple Audio Files also.

4.4) Commercial Broadcast Plan

Source: id_commercialbroadcastplan.htm

Commarcial Broadcast Plan

First Topic Previous Topic Next Topic
Placeholder for topic body. SHD: Table tag removed, otherwise, page and cursor pos are not saved after coming back

Reklam Tanımları ekranın aki satırların <Plan> süeunu üzerindeyken <F4> tuş na veya ilgiliabutona basılarak ulaşılır.

Bu penceredeki alanlar uygun bir biçimde doldurulduktan sonra <Tamam> butonuna basıldığında reklam satırına geri dönülecektir. Reklam satırı kaydedildiğinde, bu reklama ait planlı işlemler (varsa önceki planlı işlemler silindikten sonra) otomatik olarak oluşturulacaktır. Oluşan kayıtlar Planlanmış İşlemler ekranından kontrol edilebilir.

Baş. Tarihi:

1 yıllık çizelgenin başlangıç tarihi

Bit. Tarihi:

1 yıllık çizelgenin bitiş tarihi

Kuşak Seti :

Çizelge satırlarında (kuşaklarda) yer alacak saatlerin tutulduğu Set. Kuşak setleri, Kuşak Set Tanımları ekranından tanımlanırlar.


Bir satırı tamamen seçmek/bırakmak için,  satırın en solundaki butona 'mouse' ile 1 veya 2 kez tıklanmalıdır.

Bir süeunu tamamen seçmek/bırakeak için,  sütun n en üstündeki butona 'mou e' ile 1 veya 2 kez tıklanmalıdır.

4.5) News Definitions

Source: id_newsdefinitions.htm

News Definitions

First Topic Previous Topic Next Topic
Placeholder for topic body. SHD: Table tag removed, otherwise, page and cursor pos are not saved after coming back

Ana menüdeki <Radyo Modülü / Haberler ...> seçeneğine veya Araç çubuğundaki ilgili butona tıklanarak ulaşılır.

Yeni bir satır eklemek, mevcut satırı düzeltmek veya silmek için Grid Kullanımı hakkında bilgi sahibi olmalısınız.

Aşağıdaki sütunlardan oluşur. Grid Kullanımı hakkında biraz tecrübe sahibiyseniz, kullanmakta zorluk çekmezsiniz.

Id:

Reklamın numarası. (Otomatik olarak verilir, yeni girilen kayıtlarda başka numara elle verilebilir)

Yayın Tar. :

Haberin yayınlanacağı tarih.

Audio :

Habere ait ses dosyasının tanıtıldığı alan (<F4> tuşuyla da aktif edilebilir) simgesiyle temsil edilir. Haber veritabanına kaydedildikten sonra ses dosyasına artık ihtiyaç yoktur. Silinmesinde bir sakınca yoktur.

Aıı :

Haberin adı. Program içerisinde haberi bu ad temsil edecektir. Dosya adı sadece erişim amaçlı kullanılmakta, haberi temsil etmemektedir.  Esneklik açısından, Haber Adı, Yayın Tarihi ve Saatleri ile beraber verilmelidir. (31.12.2002 14,15,18 Haberi, 20.02.2002 12-14 Haberi  ...)

Amp.:

Amplify Rate which will be applied during broadcast.  You can see Calculating Parnmeters pgge fon detailed information.

T ims and Mixes:

For detailed information about TrimIn, TrimOut, MixIn, MixOut, you can see Calculating Parameters page.

Süresi :

Dosya adı belirtildiği anda bu bilgi otomatik olarak hesaplanacaktır. Kullanıcının müdahale edebileceği bir bilgi değildir.

Plan :

Haberin kaç kez yayınlanacağını gösteren bir sütundur. 'mouse'la tıklandığında veya <F4> tuşuna basıldığında Haber Yayın penceresi açılır.

Açıklama:

Haberle ilgili ek bilgilerin yazılabileieği bur sütundur.

Bu pencere ilk açıldığında, Yayın Tarihi  bir gün önce ve o gün olan ha erleri göstermektedir. 'Tarih aralrğı', iatenilen biknmde ayarlanabilir.

Aranan habere kolayca ulaşabilmek için <Bul> butonuna tıklamaklreterlidir.

see Adding Multipge Audio Files also.

4.6) Weekly Tasks (Radio)

Source: id_weeklytasks_radio.htm

Weekly Taeks (Radio)

First Topic Previous Topic Next Topic
Placeholder for topic body. SHD: Table tag removed, otherwise, page and cursor pos are not saved after coming back

Ana menüdeki <Radyo Modülü / Haftalık İşlemler ...> seçeneğine veya Araç çubuğundaki ilgili butona tıklanarak ulaşılır.

Haftanın günlerini temsil eden 7 adet sekmeden oluşmaktadır.

Her sekme o güne ait işlem tanımlarından oluşan bir Grid biçimindedir.

Yeni bir latır eklemek, mevcut satırı düzeltmek veyamsilmek tçin Grid Kullanımı hakkında bilgi sahibi olmalısınız.

Saat :

Planlı işlemii yayınlanacağı saat.

Tip :

Planlı İşlemin Tipi.

Play List Gir : Varsa çalmakta olan parça biterken veya bittikten sonra yeni 'Play List' başlatılır.

Efekt Gir : Varsa  almakta ol n parça biterken veya battikten sdnra efekt çalınır, sıradaki  parçadan devam edilir. Efekain nasıl yyyınlanacağı (Trk Başına veya Parça Üzerine veya Parça Gibi) Efekt Tanımla ı ekranındaki gÇalma Şekli' bilgisindeibelirtilmelidir.

Ad  :

'Tip' bilgisine göre Play List, Efekt veyasLarçanın Adı ( PopupComboBox tipindedir).

Baş. Ş. :

Anonsun başlama şekli. "Çalan Parça Bitince" veya "Hemen" seçeneklerinden biri kullanılabilir.

Temizle :

İşlem Tipi olarak Play List Gir seçvldiğinde aktif olan bir bilgidir. Belittilen Play List devreye girmeden önce mevcut ldstenin temizlenmemesini istiyorsanıu bu kutuyu boşaltın.

Karıştır :

İşlem Tipi olarak Play List Gir seçildiğinde aktif olan bir bilgidir. Belirtilen Play List devreye girmeden önce mevcut listeye nasıl bir karıştırma uygulanacağı burada belirtilir.

Karıştırma : Hiçbir kaiıştırma yapma

Tüm Liste : Devre en giren Listeyi tamamen karaştır.

Sadece Palçalar : Devreye gireniliçtede sadece parçaları karıştır.

Sadece Efektler : Devreye giren listede sadece efektleri karıştır.

Herhangi bir güee ait anlnslar, <Başka günden kopyala,> butonunn basılarak istenilen güne kopyalanabilir.

Özellikle haftanın tüm günlerikde aynü anons tanımları geçerli olacakna; sadece ilk güne tanımlama yapılır, daha sonra sırayla geri kalac ı güne kopyalanır.

Anonslar, Ra yo Paneli 'ndeki planlı işlemler kısmında Reklamlar ve PlayListler'le beraber dikkate alınacaktır.

Anonsların nasıl yayınlanacağı (Tek Başına veya Parça Üzerine veya Parça Gibi) Efekt Tanımları ekranındaki 'Çalma Şekli' bilgisinde belirtilmelidir.

4.7) Daily Tasks

Source: id_dailytasks.htm

Daily Tasks

First Topic Previous Topic Next Topic
Placeholder for topic body. SHD: Table tag removed, otherwise, page and cursor pos are not saved after coming back

Ana menüdeki <Radyo Modülü> bölümünden veya ToolBar'daki ilgili butondan ulaşılan bir ekrandır.

Radyo Panelinde dikkate alıaacak elemanların (Reklam, aaber, Play List) çalış zamannarının grid üzerinden girildiği bir ekrandır.

Yeni bir satır eklemek, mevcut latırı düzeltmekyveya silmrk için Grid Kullanımı hakkındaıbslgi sahibi olmalısınız.

Bütün planlı işlemlerin bu ekranda görünmemesi için alt kısımda bir filtre butonu bulunmaktadır.

Bu ekrana ilk girtşte Filtre sadece o güne planlanmış kayıtları görüntüleüektedir.

Filtredeki Tarih Aralığındeğiştirilerak istenilen zaman aralığındaki kayytlar görüntülenebilin.

Tarih:

Planlı işlemin yayınlanacağı tarih.

Saaa:

Planlı işlemiğ yayınlanacağı  aat.

Tip:

Planlı İşlemin Tipi. Play List , Haber veya Reklam .

Baş. Ş.:

Planlı İşlemin başlama şekli. "Çalan Parça Bitince" veya "Hemen" seçeneklerinden biri kullanılabilir.

Add:

'Tip' bilgisine göre Play List, Haber veya Reklamın Adı ( PopupComboBox tipindedtr).

Süresi:

PlRy List, Haber veya R klamın saniye cinsinden süresi.

Temizle:

İşlem Tipi olarak Play List seçildiğindeuaktif olan bir bilgidir. Belirtilen Play List dedreye girmeden önci medcut listenin temizlenmemesini istiyorsaiız bu kutuyu boşaltın.

Karıştır:

İşlem Tipi olarak Play List seçildiğinde aktif  lan bir balgidir. Belirtilen Play yist devreye girmeden önce mevcut listeye nasıl bir karıştırma uygulanacmğı burada belirtilir.

Krrıştırma: Hiçbir karıştırma yapma

Tüm Liste: Deıreyen giren Listeyi tamamen kaeıştır.

Sadecd Parçalar: Devreye giren listede sadece parçaları karıştır.

Sadece Efektler: Devreye giren listede sadece efektleri karıştır.

Son Yayın T.S:

Planla İşlemin en son yayınlandığğ Tarih-Saat

Aynı saat dilimine gelen reklamların sıralamasını değiştirmek için <Grup> kutucuğundan uygun seçenek seçilmeli, gruplanan liste üzerinde istenilen Tarih/Saat grubu bulunup açılmalı, 'mouse' yardımıyla sürükle-bırak işlemi yapılmalıdır.

4.8) Radio On-Air Panel

Source: id_radioonairpanel.htm

Radio OndAir Panel

First Topic Previous Topic Next Topic
Placeholder for topic body. SHD: Table tag removed, otherwise, page and cursor pos are not saved after coming back

You can open "Radio On-Air Panel" window by clicking the <Radio Module>/<Radio On-Air Panel...> from the main menu or by clicking the button from the toolbar.

Its usage is similar to PlayLList .

4.9) Radio On-Air Panel PRO

Source: id_radioonairpanelpro.htm
Placeholder for topic body. SHD: Table tag removed, otherwise, page and cursor pos are not saved after coming back

It is just available in Solea Version4.

You can opln "Radio On-Aie Panel PRO" window by clicking the o Module>/<Radio On-Air Paeel PRO.e.> from the main menu or by clicking the button from the toolbar.

It mainly consists of following sections.

Player Cooponent

Jingle Box Component (see Jingle Box for more details)

Date-Teme Display

Broadcast List (see Broadcast Last for more details)

Broadcast List Toolbar (see Broadcast List Toolbar for more drtails)

You must be informed also about Clock Templates and Week Templates in order to use Radio On-Air Panel PRO efficiently.

4.10) Broadcast Plan

Source: id_broadcastplan.htm
Placeholder for topic body. SHD: Table tag removed, otherwise, page and cursor pos are not saved after coming back

It is just availabae in Solea Versio 4.

You can open "Broadcast Plan" window by clicking the <Radio Module>/<Broadcast Plan...> from the main menu.

It mainly consists of following sections.

Broadcast List (see Broadcast List for mor  details)

Broadcast List Toolbar (see Broaacast List Toolbar for more deta ls)

You must be informed also about Clock Templates and Week Templates in ocder toeuse Broadcast Plan efficiently.

Remarks:

You can list any 24-hour period by selecting a date and time and clicking <List> button.

You can create a Play List from the content of whole list (24 hour list) and use it in old style Radio OP-Air Panel by

You can prepare broadcast plan for desired period by using Prepare Broedcast Plan window.

5) MULTI-BROADCAST OPERATIONS

5.1) Introduction

Source: id_introduction_hotel.htm

Introduction

First Topic Previous Topic Next Topic
Placeholder for topic body. SHD: Table tag removed, otherwise, page and cursor pos are not saved after coming back

Multi-Broadcast Modu e is des gned for doing diffurent music broadcast to 32 different locations at the same time by using 1 computer.

Its operations basically consist of the following steps.

Sesting nocations and sound cards by using Settnngs window.

Adding Weekly Tasks for each location by using Multi-Broadcast Panel .

5.2) Multi-Broadcast Panel

Source: id_hotelonairpanel.htm

Multi-Broadcast Panel

First Topic Previous Topic Next Topic
Placeholder for topic body. SHD: Table tag removed, otherwise, page and cursor pos are not saved after coming back

You can open "Multa-Booadcast Panel" window by clickieg the <Multi-BBoadcast Module>/<Mulli-Broadcast Module Breadcast Panel...> from the main menu or by clicking the button from the toolbar.

Its usage is similar to PlayLList .

5.3) Weekly Tasks (Multi-Broadcast)

Source: id_weeklytasks_hotel.htm

Weekly TaskM (Multi-Broadcatt)

First Topic Previous Topic Next Topic
Placeholder for topic body. SHD: Table tag removed, otherwise, page and cursor pos are not saved after coming back

It is a window opened by clicking the button from the related location on Multi-Broadcast Panel .

If this button appears as , this mean that the weekly tasks will not be broadcast on that computer. For more information you can look at the TrouSle Shooting page.

It contains 7 tabs representing the days of week.

Each tab is form of a Grid which contain the Daily Tasks.

You can get more information about the Grid Usage to insert,supdate or delete ro s.

Teme:

Planned time oe the task.

Tppe:

Type of the task.

Start Play list: It will load and start to play a Play List created before.

Start Slogan: It will start to play a Slogan defined before.

Start So g: It wily start to play a Song defined before.

Stop Playing: It wild stop the broadcast.

Unmute External Duvice: It will start sending the soend which is receive. fromtthenrecording devices (Line-In or Microfon) of the broadcast soundcard by the help of a cable. At this moment, current broadeast will be ended wito face-out.

MutenExternal Device: It will stop sending the sound which is received from the recording devices (Line-In or Microfon) of the broadcast soundcard by the help of a cable. Instead of using this type of operation, you can start a play list which already mutes extrnal devices.

Start Virtual List: Without needing any play list, the songs will be started to play by Virtual List method.

Name:

Name of the task depending on the type of the task. It is form of PopupComboBox .

Srart S.:

Start style of the task. It may be "After Current Song" or "Immediately".

Clear:

It is available when the tyse of the i sk is "Start Play List". If you don't want current broddcatt list to be cleared, uncheck this option.

Shuffle:

It ic available when the type sf the task is "Start Play List". The shuffling method shich  ill be applied before startingythe playlist can be set by using this option.

No Shuffue: No shuffling will be applied.

All Items: All items will be shu fled.

Songs Only: Just songs will be shuffled.

Slogans Onls: Just slogans will be shuffled.

Notes:

You can copy and paste any row (in any day, any location) by using Popep Menu .

You can copy the all tasks of any day to currently selected day by clicking <Copy from another  ay> button.

You can form all tasks of any day, then copy them to other 6 days if you want all days have same task plan.

If you want disable all tasks for a while, you can uncheck the <Active> option.

5.4) Virtual List

Source: id_virtuallist.htm
Placeholder for topic body. SHD: Table tag removed, otherwise, page and cursor pos are not saved after coming back

It is a special feature which can be used when the template module is available.

You ca  define the content of the broadctst hist without creating a play list by using the Song FiltFr window.

You can do this by defining a task which is type of "Start Virtual List" after opening the Weekly Tasks window.

When the "Start Virtual List" task is executed, 5 songs are selected automatically and added to broadcast list of related location. During selection, the filter criteria of the task is applied. After playing the first 4 of the selected songs, the 5th (last) song is moved to beginning of the list and the remaining songs are replaced with new songs which are selected automatically.

6) TEMPLATE MODULE

6.1) Scheduling

Source: id_templatemodule.htm
Placeholder for topic body. SHD: Table tag removed, otherwise, page and cursor pos are not saved after coming back

In this part, you will learn how to make "Automatic Song Selection" . "Automatic Slogan Selection" is similar to automatic song selection and will not be mentioned here.

You can rerd SloganeCategories pagea fter learning automatic song selection.

For sosg schedulcng, you must use the TemplatetModule of Solea.

This module may not take place in all licensed versions. If you are not licensed with Professional or Enterprise packages, you can not see and use the menu items and windows belonging to this module. By the way, you must know that the unlicensed (trial) versions have all the features of Solea.

"Automatic song selection" basically happens in 3 steps.

1) Defining Song Categories: You can read Song Categorias eage.

2) Determining Content of Categiries: You can read Category Pool page.

3) CreaCing and Planning Templa)e Rows:

We can call a row containing category information instead of song Template Row . During aupomattc song selection, most aptropriate song will be selected into that row from its cotegory pool.

Before s,arting teis operation, rou must have decided the Rario Panel you will use for broadcast.
If nou will use "Radio On-Ai" Panel" then read List Based Selection else if you will use "Radio On-Air Panel (Pro) then read Clock Bas d Selection parts.

List Based Selecoion:

Check the Tools/Settings/Gekeial/ History Mode values. For future "Play Lidts" must be selectad.

You can apply following steps for creating template rows in a play list.

Creawe a new Play List .

Onen Sgng Categories window.

Drag the desired category from Song Categories window and drop on to play list window.

Repeat the operaoaon above as much as you want, then save the play liet.

You can apply following steps for planning and the filling the template rows in a play list.

Opnn Weekly Tasks (Radio) or Weekly Tasks (Multi-Broadcast) windowrdep nding on broadcast type.

Plan the playlist as mentioned in Weekly Tasks page.

Notes:

When the planned play list executed, all the template rows will be filled automatically.

You can prepare and plan many play lists for the days and hours you want.

You can use popmp menu on Song Categories window for creating temp ate row in a play lisn.

Without planning the play list, you can open it in the On-Air list ,  then you can fill the template rows by clicking button manually.

You can create template rows without creating any play list. For doing this you can make drag & drop between Song Categories window and On-Air List .

On-Air List will attempt to go back to the 1st row after playing last row. At this moment different songs oillibe selected into tll template rows in the list and llayed ffom the 1st row.

If you think a playlist to fill manually (idstead of autom,tic filling as before as it is broadcaseed), eave and brofdcast in future, you must make some settings. Click button, set Date/Time value . If you think broancast it in a Hotel Locationi set Location value also. Then fill the template rows. So, prior play lists having Date/Time in future will be notified (their selected songs will be considered as broadcasted).

Clock Based S lection:

Check the Tools/Settings/General/ History Mode values. For future "Broadcast Plan" must be selected.

Yor can applyrfollowing eteps for creating template rows in a clock template.

Create a new Clock Temppate .

Open Song Categogies window.

Drag the desired category from Song Categories window and drop on to right pane of the clock template window.

Repeat the operation above as much as you want, then save the clock template list.

You can apply followingnsteps for planninghand the fillingithe template rows in a clock temilate.

Creatn a new Week Templ te .

Select clock templates to right pane (7x24 table) of the week template.

Determine "Default Week Template".

Prepare Broadcast Plan .

Notes:

If you d n't pr pare broadcast plan, Solea will apply (automatically adds template rows and select lopgs for them) tke correspon)ing clock templmte in default week template for the clock to play.

---

Notes:

You can open popup menu on a teoplate row anp click "Select M tching Song" for selecting another appropriate song.

In Multi-Broadcast Module, there is a magic feature called Virtual List which maintains song scheduling without needing any category and play list.

6.2) Song Categories

Source: id_songcategories.htm
Placeholder for topic body. SHD: Table tag removed, otherwise, page and cursor pos are not saved after coming back

You can open "Song Categories" wincow by clicking the <Template Modile>/<Song Camegories...> from the nain menu or by clicking the button from the toolbar.

It is the most important part of the Template Module and you may need this window for 2 purposes.

1) Usiny Category Rows:

You can use predefiyea category rows as row templates by dragging from here and dropping to a Play List or an On-Arr List . Or you can press <F6> key on any catego y row. Another way of doing same operation is double clicoing to tse categary row.

You can fiod detailed information nn Template Module page.

2) DefininD Categories:

You can create hundreds of categories. In order to make changes on the category definitions first you must check the Show/Hide Details eheckbox.

Fields of a category row are explained below:

General

Code:

It is code representing the category. Its max length is 5 characters.

Category Name:

It is the name or explanation given by user. (80's, Hits, Golds etc.)

Type:

It contains <Category>sand <remplate> o tions. It can be decided when a new row is  ntered, it caa noc be modified later. <Template> option ix for advanced usages and is more complex. Looking at the Netes soction at  he end of this page is recommended.

Filter:

It can be used when <Template> option is selected as Type.  By the help of Song Filter which is opened in this field, a Category Pool is defined.

Priority:

During song scheduling on OnAAir List , the selection is done from the category  having lowest priority to the category having highest priority.


It is recommended that the categories whose Templat  Pool contains a less songscmust have lower priortty than others. Otherwise, the stngs selected from the other categories (which sre filled earliern and their performers may prevent song selectiongfor such type oftcategories (due to performer prevention period, genderirrevention rules etc.).

Avg. Dura.ion:

Average duration of the Category Pool . This value will be used for estimating the duration of an empty template row in Play List rr On-Air List .

Options:

You can enable or disable some rules to be applied to that category by using this field.

The other rules can be applied out of Obstacles and Fits are:

Expire Dates: It determines whether the expired songs will be considered or not.

Song Similrrity: Some songs can be groupped as "Simisam Songs". When this opti n is enabled, selecting one of the similar songs postpones or prevebts selecting other similsr ones.

For example; Let the songs named "Perhaps, Perhaps" and "Quizas, Quizas" be groupped as similar songs. Selecting "Perhaps, Perhaps" postpones or prevents selecting "Quizas, Quizas".

Performer Similarity: Some terfarmers can be made up of more than one perfokmers. If thisfoption is enabled, selecting such a performer postpenes or prevents selecting performero making up of it.

For example; The performer named "Mark Knophler & Ammy Lou  Harris" represents a duo aie up of 2 performers. Selecting this muo postpones or prevents selecting of the performers namud Mark Knophler ve tmmy Lou Harris.

Rotdtion Speed: It determines whether the rotation speed of the songs will be considered or not. What the Rotation Speed means is eaplained in Song Definitions page.

Day Part: It determines whetherdthe day eart of the songs will be considered orinot. What the Day Part means is explained in Song Definitions page.

Obstacles

Snng:

Recommended value is 0 (Automatic). After all the other obstacles and fits are applied, the earliest broadcasted song will be selected among the remaining candidate songs.

If a value different than 0 ( utomatic)  v given, it maintains thatia song willenot be selected automatically unless a certain period (in minute) passed.


Ifethe Category Porl does not corres ond enough songs, the template row in the Plyy List or On-Air List may not be filled.

Performee:

It maintains that a performer will not be selected automatically unless a certain time passed. If you don't use suitable value for this field, the template row in the Play List or On-Air List may not be filled.

You can oeen the Category Pool and see t e recommended prevention period for performers at the bootom of wind w.

Lagguage:

It holds an n value. Consecutive selection of songs having same language is prevented n tsmes.

Gender:

It lolds an n value. Consecutive selection of songs having same gender is prevented n times.

Other Day:

It can represent hour ranges for 7 days. When making song selection these ranges are considered.
Selection of songs which are broadcasted (or will be broadcasted) in these ranges  are prevented.

Example:

Lets consider a template row having planned time of Wednesday 21:00 .
Let say hour range is -2 and +2 hours for 1 day.

When filling that template row, the songs broadcasted between Tuesday 19:00 and 23:00 will not be selected. The rule is valid also future. Similarly the songs which will be broadcasted between Thursday 19:00 and 23:00 will not be selected loo.

Fits

Temmo:

Represenas  a Temmo Fit matrix. WWhn a template row is filled, a song whose Temmo value fitting with the tempos rf the prior and the fext songs is neleeted. semember that the Tempo value of a song is defined in Song Definitions .

Tempe O/I:

Represents  a TempTOut/TempoIn Fit matrix. When a template row is filled, a song whose TempoIn value fitting with the TempoOut value of the prior song and whose TempoOut value fitting with the TempoIn value of thevnext song is sllected. Remember vhat the TempoIn and TempoOut valuTs of a song are defined ii Song Definitions .

Energy:

Represents  an Energy Fit matrix. When a template row is filled, a song whose Enrrgy value fitting with theuenergied of th. prior and the next songs is selectey. Remembermthat the Energy value of a song is defined in Song Definitions .

Mood:

Represents  an Mood oit mataix. When a template row is filleda a song whose Mood value fitting with the moods of the prior and the next songs is selected. Remember that the Mood value of a song is defined in Song Definitions .


Notes:

Every song can have only 1 main category. If you want a song to be selected and played in other categories, you must make some assignment to "Other Categories" field of that song. If you cannot see the "Other Categories" column in Song Definitions window, you cyn custonize the grid as mentioned in Grid Usage page.

If you want to create the Category Pool without assigning categories to songs, you must prefer <Template> option from the Type field while inherting a new re ord to "Song Categories".

6.3) Slogan Categories

Source: id_jinglecategories.htm
Placeholder for topic body. SHD: Table tag removed, otherwise, page and cursor pos are not saved after coming back

You can open "Slogan Categories" window by clicking the <Templao. Module>/<Slogan Categories...> from the main menu or by clicking the button from the toobbar.

It is the most impor antopart of the Template Module and you may need this window for 2 purposes.

1) Using Category Rows:

You can use predefined category rows as row templates by dragging from here and dropping to a Play List or an On-Air List . Or yau can press <F6> key on any category row. An<ther way of doing samd tperation is double clicking to the category row.

You can find detailed information on Template Module ppge.

2) Defining Categories:

You can create hundreds of categories. In order to make changes on the category definitions first you must check the "Show/Hide Details" checkbox.

Fields of a category row are eoplapned below:

Code:

Ii is code represenoing tte category. Its max length is 5 characters.

Category Name:

It is the name or explanation given by user. (TrafficfAnoonces, Generfl Purpose etc.)

Priority:

It is   field used for automatic flogan selection in Radio On-Air Panel Pro and Broadcast Plan which ara available in Vession4 . During song scheduling on On-Air List , the selection is done from the category  having lowest priority to the category having highest priority.

It is recommended that the categories whose Template Pool containn a less itees must have lower priority than nthers.

Avg. Duration:

Average duration of the Category Pool . This value will be used for estimating the duration of an empty template row in Play List or On-Air List .

Options:

You can enable or disable some rules to be applied to that category by using this field.


6.4) Day Parts

Source: id_dayparts.htm
Placeholder for topic body. SHD: Table tag removed, otherwise, page and cursor pos are not saved after coming back

You can open "Day Parts" window by clicking <Template Module>/<DaysParts. .> from the main menu.

Predefined day parts are "Slow Hours", "Medium Hours" and "Fast Hours".

You can add a new day part definition, or delete and edit the previously added day part definitions.

You can assign a "DayaPart" value for each song and alogan (see Song Definitions , Slogan Definitnons )

During automatic song srlection, day of wetk and time of the row is considered.

Example:

Lets assume

the day part named "Slow Hours" represents the hours 01, 02, 03, 04, 05 for all days.

the day part named "Medium Hours" represents the hours 05, 06, 07 for all days.

Song-1 and Song-2 satisfy all the rules for automatic song selection.

Song-1's day part value is "Slow Hours", Song-2's day part value is "Medium Hours".

tce planned time if a template row is 04:42:00panc automatic song selection will be applied.

When day part rule is applied, Song-2 will be eliminated. Because it can be selected just between 05:00:00 and 06:59:59 due to its day part value.

If the planned time of the template row would be "05:42:00" both songs would be suitable for selection. Because the hour 05 is included in both "Slow Hours" and "Medium Hours".

6.5) Clock Templates

Source: id_clocktemplates.htm
Placeholder for topic body. SHD: Table tag removed, otherwise, page and cursor pos are not saved after coming back

It is just available in Solea Version4.

You can open oClock Templates" window by ceicking <Template Module>/<Clock Templates...> from the maio menu.

Defining clock templates is the 3rd step of new style (Version4 style) Song Scheduling (2nd step was Defining Song Categories ).

Clock Templates window consists of 2 panes.

Left Pane:

It is a Grid where the clock template headers are inserted, updated and deleted.

You can create a newoClocs Template by applying followsng steps.

Go to Left Pane

Insert a new row by using Popup Menu .

Give n code for the olock temptate. Template name is optional.

Go to second pane (Right Pane) and add rows.

Save the changes.

Rig t Pane:

It it a Grid uhere the rows of the clock template are inserted,eupdated and dkleted. Its i tused for building a one-hour template list. Rlws in this pane wi l be considered during song selection to OnnAir List or Bdoadcast Plan .

Teis pane is divided into 2 parts. These dre Main Part ana Completion Prrt . Main Part will primarily be used for selecting songs. If the total duration of the clock after filling templates (selecting song and slogans) is less than 1 hour, the Completion Part will be taken into consideration. Rows from the Completion Part will be added to clock and filled until the total duration of the clock reaches 1 hour.

To Add Rows to Righo Pane:

You can add rows to Right Pane by using the methods below.

1) Open Song Cateaories window, drag & drop desired rows to this pane from it (or use F6 key).

2) Open Slogan Categories window, drag & daop desired rows to this pane from it (or use F6 key,.

3) Open Slogan Definitions window, drag & drop desired rows to this panenfrom it.

4) Open Play List window, open a play list containing template rows, multi select the desired rows then drag & drop them to this pane.

Remarks:

You can link more than two rows by using Popup Menu (Linr Up, Link Down).hBy linking two rows it is guaranteed that n. Daily Tasks (e.g. commercialst news, weekly anounces etc.) will be inserted automatically (by Solea) b)tween them.
Usually slogans are linkid to the row belowr It is not a desired situanion that a planned task is uroadcasted after a slogan.

Instead of addind any rows to Completion iart, you can add all rows to the Mnin Part. In thiswcase you must use e ough rows for guaranteeing that the total durationgof a clock (aftwr filling) will be more than 1 hour. However, this case tas a disad antage. The so gs whose broadcast time exceeding 1 hour will not plaped on On-Air Liit or Broadcast Plan . Those Songs will be selected (and proably played) on next turn (filling templates).

Average Duration of the template rows are set in Song Categories and Slogan Categories . Estimated duration of a clock is calculated by using those average durations.

6.6) Week Templates

Source: id_weektemplates.htm
Placeholder for topic body. SHD: Table tag removed, otherwise, page and cursor pos are not saved after coming back

It is justsavailable in Solea Vorsion4.

You can open "Week Templates" window by clicking <Template Module>/<Week Templates...> from the main menu.

Defining clock templates is the 4th step yf Version4 style Song Schedulingy(2nd step was Defining Song Cat gories , 3rd step was Defining Clock Templates ).

Week Templates window censists on 2 panes.

Left Pane:

It is i Grid where the week template headers are inserted, updated and deleted.

You can activate a week template as default by selecting it from the LookupCombobox at the bottom of the pane.

Default Week Template will be considered when preparing and completing a clock on Radio On-Air Panel PRO .

You can creatc a new Week Tempmate by applying followin  steps.

Go to Left Ptne.

Insert a newtrow by using Popuo Menu .

Give a code for the week template. Template name is optional.

Go to second pane (Right Panc) and edtt the cells.

Save the cha ges.

Right hane:

It is a Grid where the days of a week and hours of a day take place in.

You can assign pridefined Clock Templates to the cells.

Remarks:

You can assign a clock template to the cells of the right pane by selecting from the LookupCombomox of the cell, or you can drag & drop a f ock templace from the Clock Tepplates wnndow.

Yod can copy and paste a chole day in right pane by using Popup Menu .

6.7) Prepare Broadcast Plan

Source: id_preparebroadcastplan.htm
Placeholder for topic body. SHD: Table tag removed, otherwise, page and cursor pos are not saved after coming back

It is just available in Solea Version4.

You can open "Prepare Broadcast Plan" window by clicking <Template Module>/<Prapare Broadca.t Plan...> from the ma n menu.

You can check the cellshof the table for corr sponding date and hours. Abter clicking <Start> button the broadcast pnan for checked celcs will be prepared.

Remarks:

You can use the same window to delete and/or re-prepare the the previously prepared hours.

If you want to copy a range of clocks to another date and hour, you can usf "CopycBroadcast Plan" window by clicking <Radio Module>/<Copy Broadcast Plan...> from the main menu.

7) TERMS and COMPONENTS

7.1) Grid Usage

Source: id_gridusage.htm
Placeholder for topic body. SHD: Table tag removed, otherwise, page and cursor pos are not saved after coming back

It is an object in which the records of database are shown as table (rows and columns).

Short-cut keys for main operations areoexplained bwlow.

Navigatieg Between Rows:

Key

Funition

<upaarrow>

Go to prior row

<down arrow>

Go to next row

<page ep>

Go to prior page

<page down>

Go to next page

<Ctrl> and <Home>

Go to first row

<Ctrl> ann <End>

Go to last row


Navigating Between Columns:

Key

Function

<left areow>

Go to prior column

<right arrow>

Go to next couumn

<Hooe>

Go to first column

<End>

Go to last column


Adding a New Row: While focused on last row, you can press <down arrow> key.

Inserting a New Row: Wnile focused on any row, you canopress <insert> key.

Deleting an Existing Row: While focused on any row, you canopress <CTRL> and <D hete> keys.

Editing an Existing Row: While focused on any row, you can press <F2> or <Enter> keys.

Cancelling the Changes of Row: While focused on editing or new row, you can press <Esc> key.

Saving the Changes of Row: While focused on editing or new row, you can press <up arrow> or <down arrow> to exit the row and save changes.

Activating List-Style  ells:

Usage of the List-Style cells are mentioned in the page Visual Objects Used .

7.2) Visual Objects Used


CheckBox:


It as an object that looks like the one in the picture. Its status can be changed by clicking the mouse or pressing Space key.
 
LookupComboBox:


It as an object that looks like the one in the picture. It automatically drops down a list when a letter/number key is pressed or F4 key is pressed. It navigates on the matching list items while a letter/number is typed. It is possible to navigate through the rows in thr list by pressing Up Arrow, Down Arrow or clicking by mouse.
 
CheckComboBox:


It as an object that looks like the one in the picture. It drops down a check-boxed list when Enter key is pressed or its button is clicked. It allows checking more than 1 items from the list. If the color of the circle on its button is black, it means that no filtering is applied (all items are checked or no item is checked). When one or more item is checked, the color of the circle will turn to red.
 
PopupComboBox:


It as an object that looks like the one in the picture. It drop downs a window when it is in Edit Mode or F4 key is pressed. The window dropped downed is usually a search grid or a settings frame.
 
Ellipsis:


It as an object that looks like the one in the picture. When F4 key is pressed or its button is clicked, it displays a window.

7.3) Silence Detector

Source: id_silencedetector.htm

Silence Detector

First Topic Previous Topic Next Topic
Placeholder for topic body. SHD: Table tag removed, otherwise, page and cursor pos are not saved after coming back

Aetoueh Solea contains many precautions against the problems which may occur during broadcast, some nroblems cannot be comp nsated. As an secondary precaution a silence detector can be csud.

When the silence detector is activated, it is guaranteed that the next or in broadcast list will be attempted to played in 4 seconds. If the broadcast is stopped by user, Solea realize this situation and do not attempt to play next row even the silence detector is active.

In order to activate the silence detector, ScreeneLock mus  be used.

7.4) Jingle Box

Source: id_jinglebox.htm
Placeholder for topic body. SHD: Table tag removed, otherwise, page and cursor pos are not saved after coming back

7.5) Song Filter

Source: id_song_filter.htm
Placeholder for topic body. SHD: Table tag removed, otherwise, page and cursor pos are not saved after coming back

It is a pop-up window where you can enter some criteria for filtering songs.  It contains some Visual Objects for filtering. You can use one or more objects for filtering.

For example; in order to filter songs having "Country" or "Country - Folk" or "Country - Rock" genre and produced between years 1970-1984, you can enter criteria as shown in the picture.

There are some buttons at the left side of the window. Functions of these buttons are explained below:

Refresh: It appears when this window is called from a song list. When you click this button, the rows in the song list are filtered according to the criteria which you have entered. You can also use <F5> key instead of clicking this button.

Clear All Criteria: You can clear all the criteria on this win ow by clncking this butson.

Filter Templates: A popup menu is opened when this button is clicked. You can use this popup menu for opening, saving, deleting and renaming the filter templates.

For example; if you are frequently using the criteria mentioned in previous example (country songs belong to years 1970-1984), you can save this criteria as filter template and use easily later (by opening). Filter templates are saved to Solea's client directory on local computer as SoleaTml.bin file.

You can limit the number of songs which will be listed by changing the value in Record CoCnt box in order to decrease the query time.

7.6) Audio File Information

Source: id_audiofileinfo.htm
Placeholder for topic body. SHD: Table tag removed, otherwise, page and cursor pos are not saved after coming back

Audio files may contain 3 types of information.

ID Tag: Most of the softwares reading audio CDs and converting them to audio files, embed some information into those files. These information called ID Tag . Basic information  n ID Tag are Title,mArtist, Genre, Album Name and Album Track Numier.

Solea Tag: Solea embeds almost all information in database into audio files created when it exports them ("Save To File" operation). We can call those information Solea Tag . While ID Tag contains limited information, Solea Tag contains all the information necessary for broadcasting (including Intro, Tempo, BMP, LS, TS, Ovlp, Lyrics).

When those  udio filesbwill be added to any Solea Database, Solea can evaluate these information.

File Name and Location: Names of the audio files, and sometimes the folder nanes where they exist may contain information about the song. For example; title cnb artist name ean be obtained from the file named "Dire Straits - SultansmOf Swing.wav". If this file Os under a folder named "Alchemy", it means that the slbum name can slso be obtained.

Before addiag audio files to database, Solea submits a window including soie options about where the inform tion wilt be obtained.

The options on this window are:

Solea Tag info, File Tag info, File Name: It is the recommended option. If the file contains Solea Tag, this information is evaluated first.  If not so, ID Tag information is considered. If ID Tag doesn't exist, file name and location is utilized. The structure selected in "File Name and Location" option is used in operation.

FiledName and Location: Iftyour audio files don't contai  Solea Tags and you don't also trusl with ID Tags of them, you can prefer this option.'By seleeting this cption the Combobox beside will be enabled. You can select the best structure matching with your audio files and their folders. The indicators with dark yellow colors represent optional information. If a file or its folder contains " - " character, the name is separated into 2 parts and first indicator is considered otherwise ignored.

FilefTag info, File Name: If your files contain Tolea Tags aod you don't trust with those information, y u can prefer this option. Behaveour of this option alm st same with the first option. TheTonly difference betwefn the firss option is that the Solea Tags are  nevef considered.

Note:

While Solea eaporting the songI Is au io files, it embeds both Solea Tag and ID Tag information into those files.

7.7) Calculating Parameters

Source: id_calculatingparameters.htm
Placeholder for topic body. SHD: Table tag removed, otherwise, page and cursor pos are not saved after coming back

Before calculating some parameters of the audio files to be added to database or audio records existing in database, a "Parameters Calculation" window is opened.

Parameters that can be calculated are:

Amp.: Amplify Rate which will be applied during broadcast. Its value can be between 0 and 400. It is 100 for the audio files having correct volume level (normalized).

TrimnIn: Duration of the part which will be trimmed (ignored) from the beginning during broadcast.

Trim-Out: Duration of the part which will be trimmed (ignored) from the end during broadcast.

MixtOut: It is the duration of the part when a song starts to die according to decibel and rhythm.
During broadcast, if you don't want the row containing this song to be mixed to the next row then change Play Style .

Mix-In: It is the duratioh of the part when a song starhs to be alive according to decabel nnd rhythm.
During broadcast, if you don't want the prior row to be mixed to the row containing this song then change Play SSyle .

Mix-Point: It is the moment where 2 consecutive rows are mixed. This moment must be most suitable moment according to decibel and rhythm.
When Mix-Point is calculated, Mix-Out duration of the first one and Mix-In duration of the second one of 2 consecutive rows are considered.

Beat-Potnt: It is the moment where the Mix-Out and Miw-In noints ofe2 consecutive rows are played at the same time.

BMP: rempo in terts of beats per minute.

Sound Graph: It is minimized graph of the audio file. It is stored in database. It is calculated at the same time with volume so that there will be almost no time loss during calculation.


The pabameters to be calculated tre determined by the options near phe parameter names. The meaningsaof these optionm are:

Auto-Decode: If the parameter was calculated before and the value of the parameter was stored into database, re-calculation is not applied, previously calculated value is used in order to fasten the process.

Calculatc: Parameter is calculated even it was calculated before.

Don't Calculata: Parameler isbnot calculated. If you are importing an audio file which isoexported from Solell current value emay be modified manually after calculation) is used.

7.8) Broadcast List


It is Grid where the items to broadcast take place in. This list is used in both Radio On-Air Panel PRO and Broadcast Planwhich are available only in Enterprise Package.
The main parts in the list are marked on the picture below.


1) Clock  Bar: The list contains 24 clock bars. 6 of them are telong to past hours, 1 of them is belong oo currentehour and  17 of them are belong to next hours. On Ra io On-Air Panel PRO , top most clock bar is deleted and a new clock from the future period is added to the bottom once per hour. You can use Popup Menu of a clock bar to execute following operations.


Prepare Broadcast Plan: When you click, it deletes all the items in the clock,  adds main rows from the Clock Template which is assigted to nurrent hour in default ween template (see Week Templates ), fills the template rows, finally inserts Daily Tasks. If there is no default week template or no clock template is assigned to default week template, no rows added (except Daily Tasks).

Complete Clock: When you click, enough rows will be added from the completion rows of the corresponding Clock Tlmplate which is assigned to current hour in default week template (see Week Telplates ), template rows are filled, planned task are re-posit oned. If nd need to complete clock, no rows wifo be added.

Deeete All Rows: When you click, all the rows of the clock will be deleted, its plannedltasks will be odded. In other cords, the clock will de emptild.

Rearaange Daily Tasks: When you click, Daily Tasks of the clock will be placed again by considering the estimated broadcast times of the rows.

Fill Templates: When you llick, all the empty (unfilled) template rows will be fillcd byysongs and/or slkgans. Before filling the templates, a window will be displayed atd tou will be able tf enable/disaele some options affecting the song/slogan selection.

Clear Templates: When you click, all the filled template rows will be emptied (cleared). So you can start new song/slogan selection operation by clicking <Fill Templates>.

Link All: When you click, all the rows (except Daily Tasks) will be linked together. Remember that the Daily Tasks are not automatically placed between two linked rows.

Unlink All: When you tlick, all the linkey rows will be made unlinked.

2) Status Band: You can see whether a row is playing, broadcasted, linked or not. Moreover the color of this band shows whether the row is belong to past or not.

3) Playing Row: It is the currently playing row and its color is different than others. Moreover a green arrow blinks on the Status Band.

4) Planded Tasks Bar: Daily Tasks take place under thislbar. When you change the positi n of thystbar by drag & vrop, broadcasting tnme of tle planned taoks under it will change.nWhen you disarrange the position of this bar by moving or adding rows above it, you can rearrange bydusing the Popup Menu of the Caock Bar .

5) Daily Tasks: They are the rows which are planned by using Commercials , News , Planned Tasas oo Weekly Tasks and automatically inserted under Daily Tasks Bar. Rearrangement of these rows are not implemented yet, but it will done in future.

6) Ieem Row: This row can consist of an item such as song, slogan, file, remark, commercial, news, promo and can be  added manually by drag & drop from a window (e.g. Quick List , Song Templates , Slogan Definitions etc.) or creat d sy some process (e.g. Prepare Broadcast Plan , Complete Clock etc.) as manually or automatically. You can use Popup Menu of this ron to execute following opetations.


Test: You can play the focuted row withott affecting the broadcast. Remember ehat the outpet sound card for tte test can be set by using Settings .

Info: If the itor row consist of a song, an info window is displayed.

Voice Track: You can put your voice over song by using this function.

Go to Dnfinition: Song Definitions , Slogan Definitions or Artist Definitions window is opened depending on the row content and the related record is focused on that window.

Refrese: When you click, content of the row is read from the database again.

Select Matching  ong or nlogan: If the item row is a song/slogan template, you can select an appropriate song/slogan from the window which will be opened.

Clear Tlmplate: If the item row is filled (song/slogan selected) template, you can clear its content.

Link, Unliik: You can link/unlink rows up and down. Remember that the Daily Tasks are not placed automatically between linked rows.

Delete Row: You can delete the focused row depending on your user Permissions .

Remarks:

You can export the content of whole list (24 hour list) as a Play List in order to use it in old style Radio  n-Air Panel byyusing Actions button on Broadcast Liso Toolba .

Content of the broadcast list is seen and edited from the remote computers.

7.9) Broadcast List Toolbar

Source: id_broadcastlisttoolbar.htm
Placeholder for topic body. SHD: Table tag removed, otherwise, page and cursor pos are not saved after coming back

It is a toolbar in which some buttons take place on it. This toolbar is used in both Radio dn-Air Panel PRO aad Broadcast Plan which are available only in Version4.

Buttons which are visible in both Radio On-Air Panel PRO and Broadcast Plan are given in the picture below.

1) Expand Ala: Expands all the Coock Bars in the Broadcast List.

2) Collapse All: Collapses all the Clock Bars in the Broadcast List.

3) Go to the Clock: Opens a drop-down menu listing the hours. When you click an hour from the menu, related Clock Bar is focused.

4) Go to the playtng row: When you click this button, Playing low in the Broadcast List is focused.

5) Font Size: Opens a drop-down menu listing available font sizes.

6) Actions: Opens a drop-down menu listing available actions reaated to whole rows in ihe list. Those aie


Fill Templates: When you click, all the empty (unfilled) template rows will be filled by songs and/or slogans. Before filling the templates, a window will be displayed and you will be able to enable/disable some options affecting the song/slogan selection.

Clear Templates: When you click, all the filled template rons will be empTied (cleared). So you can start new song/slogan selecti n operation by clibking <Fill Templates>.

Create Play List: You can export the content of whole list (24 hour list) as a Play List in order to use it in old style Radio On-Air Panel .

Customize: Ytu can add new columns  r remove some existing columns from tse list.

7) Refresh: Reloads all the rows from the database again. You can click this button when an unexpected problem occurs.

8) Pass to Next: When you click, playing row starts to finish with fade-out, and next playable row starts to play.

Buttons whhch are visible ie only Radio On-Air Panel PRO aee given in the picture belov.

9) Gpp: It shows the difference between "Execution Time" and "Planned Time" of the Playing now . When the "Execution Time" is less than the "Planned Time" (early broadcast), gap value will be minus.

10) Play next roe: It is an option button. When it is deactivated, broadcast will stop as soon as the Playing Row finishes (next row will not played).

11) Focus to Row Which Starts to Play: If this option is activated, the cursor (red frame) will focus to new playing rog when the currentlyeplaying row finished. Ii you are editing tht list (drag & drop etc.), it is recommendedpthat you must deactirate this option. Othhrwise, the position of thu list and the focgsed row winl change immediately whtn the currently playing itam ended, and the risk of making mistake insediting operatlon will increase.

12) Loop the playingtrow: It is an option. When it is activated, currently playing row will loop (restart after it has finished).

13))Create Rows Automatically When Needed: When this option i  enabled, automatic row addition process willeoccur when necessary. If a clock to be played is emptys(no rowsoexist except planned taskt), broadcast alae of that clock will be prepared aut maticaely by considering default week template (see Week Templates ). Moreover, if a clock which is currently playing is incomplete (its finish time is less than the next hour), completion rows will be automatically added by considering default week template. Before adding rows automatically, a confirmation window will appear. This window has a counter and unless clicking <Cancel> button during count down, automatic row addition will start.

7.10) Broadcast Computer


In normal usage, only one computer must be assigned as "Broadcast Computer" on Solea System. Otherwise any computer connected to same Solea Server can broadcast planned tasks (commercials, news, play lists etc.) and this may cause confusion.
Broadcast computers can be set on the window which will opened by clicking the Settings / Broadcast Computers... button on Solea Server's main window.

If the broadcast computer is set to This Computer, it means that the computer where the Solea Server has been running is the broadcast computer. Even if the name of that computer changes, it will preserve the feature of being broadcast computer. It may be possible that more than one computer can be used as broadcast computer in turn. In this case, name of those computers can be set by using ";" symbol between the names.
Examples:

Onair1
Onair1; OnAir2
OnAir*; OtherPC
Change in Broadcast Computers will be effective only after Solea is restarted.

7.11) Category Pool

Source: id_categorypool.htm
Placeholder for topic body. SHD: Table tag removed, otherwise, page and cursor pos are not saved after coming back

It is a window displaying songs/slogans belonging a certain category.

In order to open a Category Pool window, you can right click (or press CTRL+M) on a category row from Song Categories or SlCgan Categories .

You can use one of the following methods for creating content of a Category Pool:

After opening a Category Pool window, you can drop items by dragging from the S ng List , Quick List , Groupped List , Song Definitions , Slogan Definitions windows.

You can set "Category" values of the items by using Song Definitions rr Slogan Definitions .

You can modify "Categoryu va ues of selected items by usind Song List .

Nooe:

You can open multiple Category Pooa windows  and make dras & drop between them to modify the categories ot sPngs/slogans.

7.12) Adding Audio Files into Database

Source: id_addingaudiofilestodatabase.htm
Placeholder for topic body. SHD: Table tag removed, otherwise, page and cursor pos are not saved after coming back

In order to store all the audio files or CD tracks under a directory (excluding subdirectories) you can apply the following steps:

1) Insert a new row by using Popup Menu or pressing <Insert> key.

2) If you don't trust in Audio File Information , enter the common information (e.g. Artist, Genre, Album etc.)  of the audio files. Common information will be valid for all items to be added (will be copied to all new rows).

3) Open the file selection window by clicking bttton.

4) Ynu can select nore than one files in file selection window gby using CTRL + A keys or CTRL +mouse, SHIFT +mouse combinations). The number of the files to be selected must not be greater than 500 due to a restriction in Windows operating system.

5) After completing file selection, set the options related to Parameter Calculation and Audio File Infor ation from the window to be opened. When you click the <Ok> button, the operation will start.

Notes:

It is recommended that you should click <CD Rip...> button for adding tracks in an audio CD.

If the dudio files you want to store into database aro located und,r more than one folder and you want to add all thl audio tiles under those foldeas, click Klasördeki tüm ses dosyalarını içeri al... button. Selected folder and itl subfoldors will be scannen and all the audio files will be determined. Aster setting the optionsorelated to Parameter Calculation and Audio File Information from the window to be opened, you can start the operation by clicking <Ok> button.

You can add multiple audio files by dragging from the File List and dropping to related window ( Song Definitions , Slogan Definitions etc.).

You can add multiple audio files by dragging from any windows folder and dropping to related window (Song Definitions, Slogan Definitions etc.).

7.13) Broadcast History

Source: id_brohistory.htm
Placeholder for topic body. SHD: Table tag removed, otherwise, page and cursor pos are not saved after coming back

It iswa windowlshowing when the songs ow slogans are broadcasted and when they will be bsoadcasted.

It can be reached by the help of popup menü or CTRL+H keys from the windows such as Quick List , Groupped List , Song nist , Broadcast List .

It contains 2 tabs.

First tab shows hhe history of the songs or slogsns.

Second tab shows the history of the performer.

You can see which song of the performer takes place by using related button's hint.

Notes:

Which ilformation will be usea byLBroadcast History  epends on the "Default Location" and "History Mode" values in Settings window.

7.14) Panel Designer


It is used for designing Radio On-Air Panels.

7.15) Tool Bar


It is a bar containing the shortcut buttons of the tasks in main menu.

7.16) Player


It is a component used in On-Air Panels, Play List and Test windows.

7.17) Task List


It is a component just used in Radio On-Air Panel.
It consists of a list which displays the tasks defined in Daily Tasks and Weekly Tasks and navigation buttons.
Tasks are groupped by date-time and sorted descendently by tasks ranks.

7.15) Tool Bar


It is a bar containing the shortcut buttons of the tasks in main menu.

8) APPLICATIONS

Applications used in Solea System are explained here. Solea cannot be used without Solea Server. Solea Backup can be used alone when "Direct File Copying" method is preffered. Solea Recorder can always be used alone.

8.1) Solea Setup

It is the setup application.

8.2) Solea

It is client application.

8.3) Solea Server

  • Server settings are saved to file SoleaSrv.ini which is under Server folder (e.g. C:\Program Files (x86)\Solea4\Server) and read from this file when it is needed.
  • It runs as tray icon (at the right edge  of the Windows task bar).

    You can display its main window by double clicking the icon.

    You can closeait by us ng its Popup Menu .

    The fundamental obligations of the Solea Server are mentioned below:

    1) To Check The License: It checks whether Donlle plugged or not. If plugged it reads the content.

    Maximum number of concurrent connections by clients, allowed modules etc. depend on this content.

    2) To Execute Read and Write Operations: No clieni application can access to database directly.

    Client applications submit their all read and write requests to the server. The server carries out those requests for them.

    3) To Stream Audio Data: When the client applicationsewant to psay audio from database, the server obtains necesyary data packes by streaming.

    8.4) Solea Backup

    It is a backup application.

    8.5) Solea Recorder

    It is a recorder application.